

Your favorite watch has stopped working. The second hand stutters across the dial, or your digital display is dim and lifeless. Before you assume it is broken or pay $20 to $30 at a jewelry store, consider this: you can change a watch battery at home, often in under 10 minutes, with basic tools and the right knowledge. This guide walks you through diagnosing, opening, replacing, and resealing your watch safely and confidently. Whether it is a slim dress watch, a Casio digital, or a water-resistant chronograph, you will learn every step without guesswork or damage.
You will discover how to identify your watch case back type, choose the correct replacement battery, avoid common mistakes, and test your watch after replacement. You will also learn when DIY is safe and when it is smarter to see a professional. With clear, actionable steps and expert tips, you will save time, money, and extend the life of your timepiece right from your kitchen table.
Identify Your Watch Case Back Type Before Starting
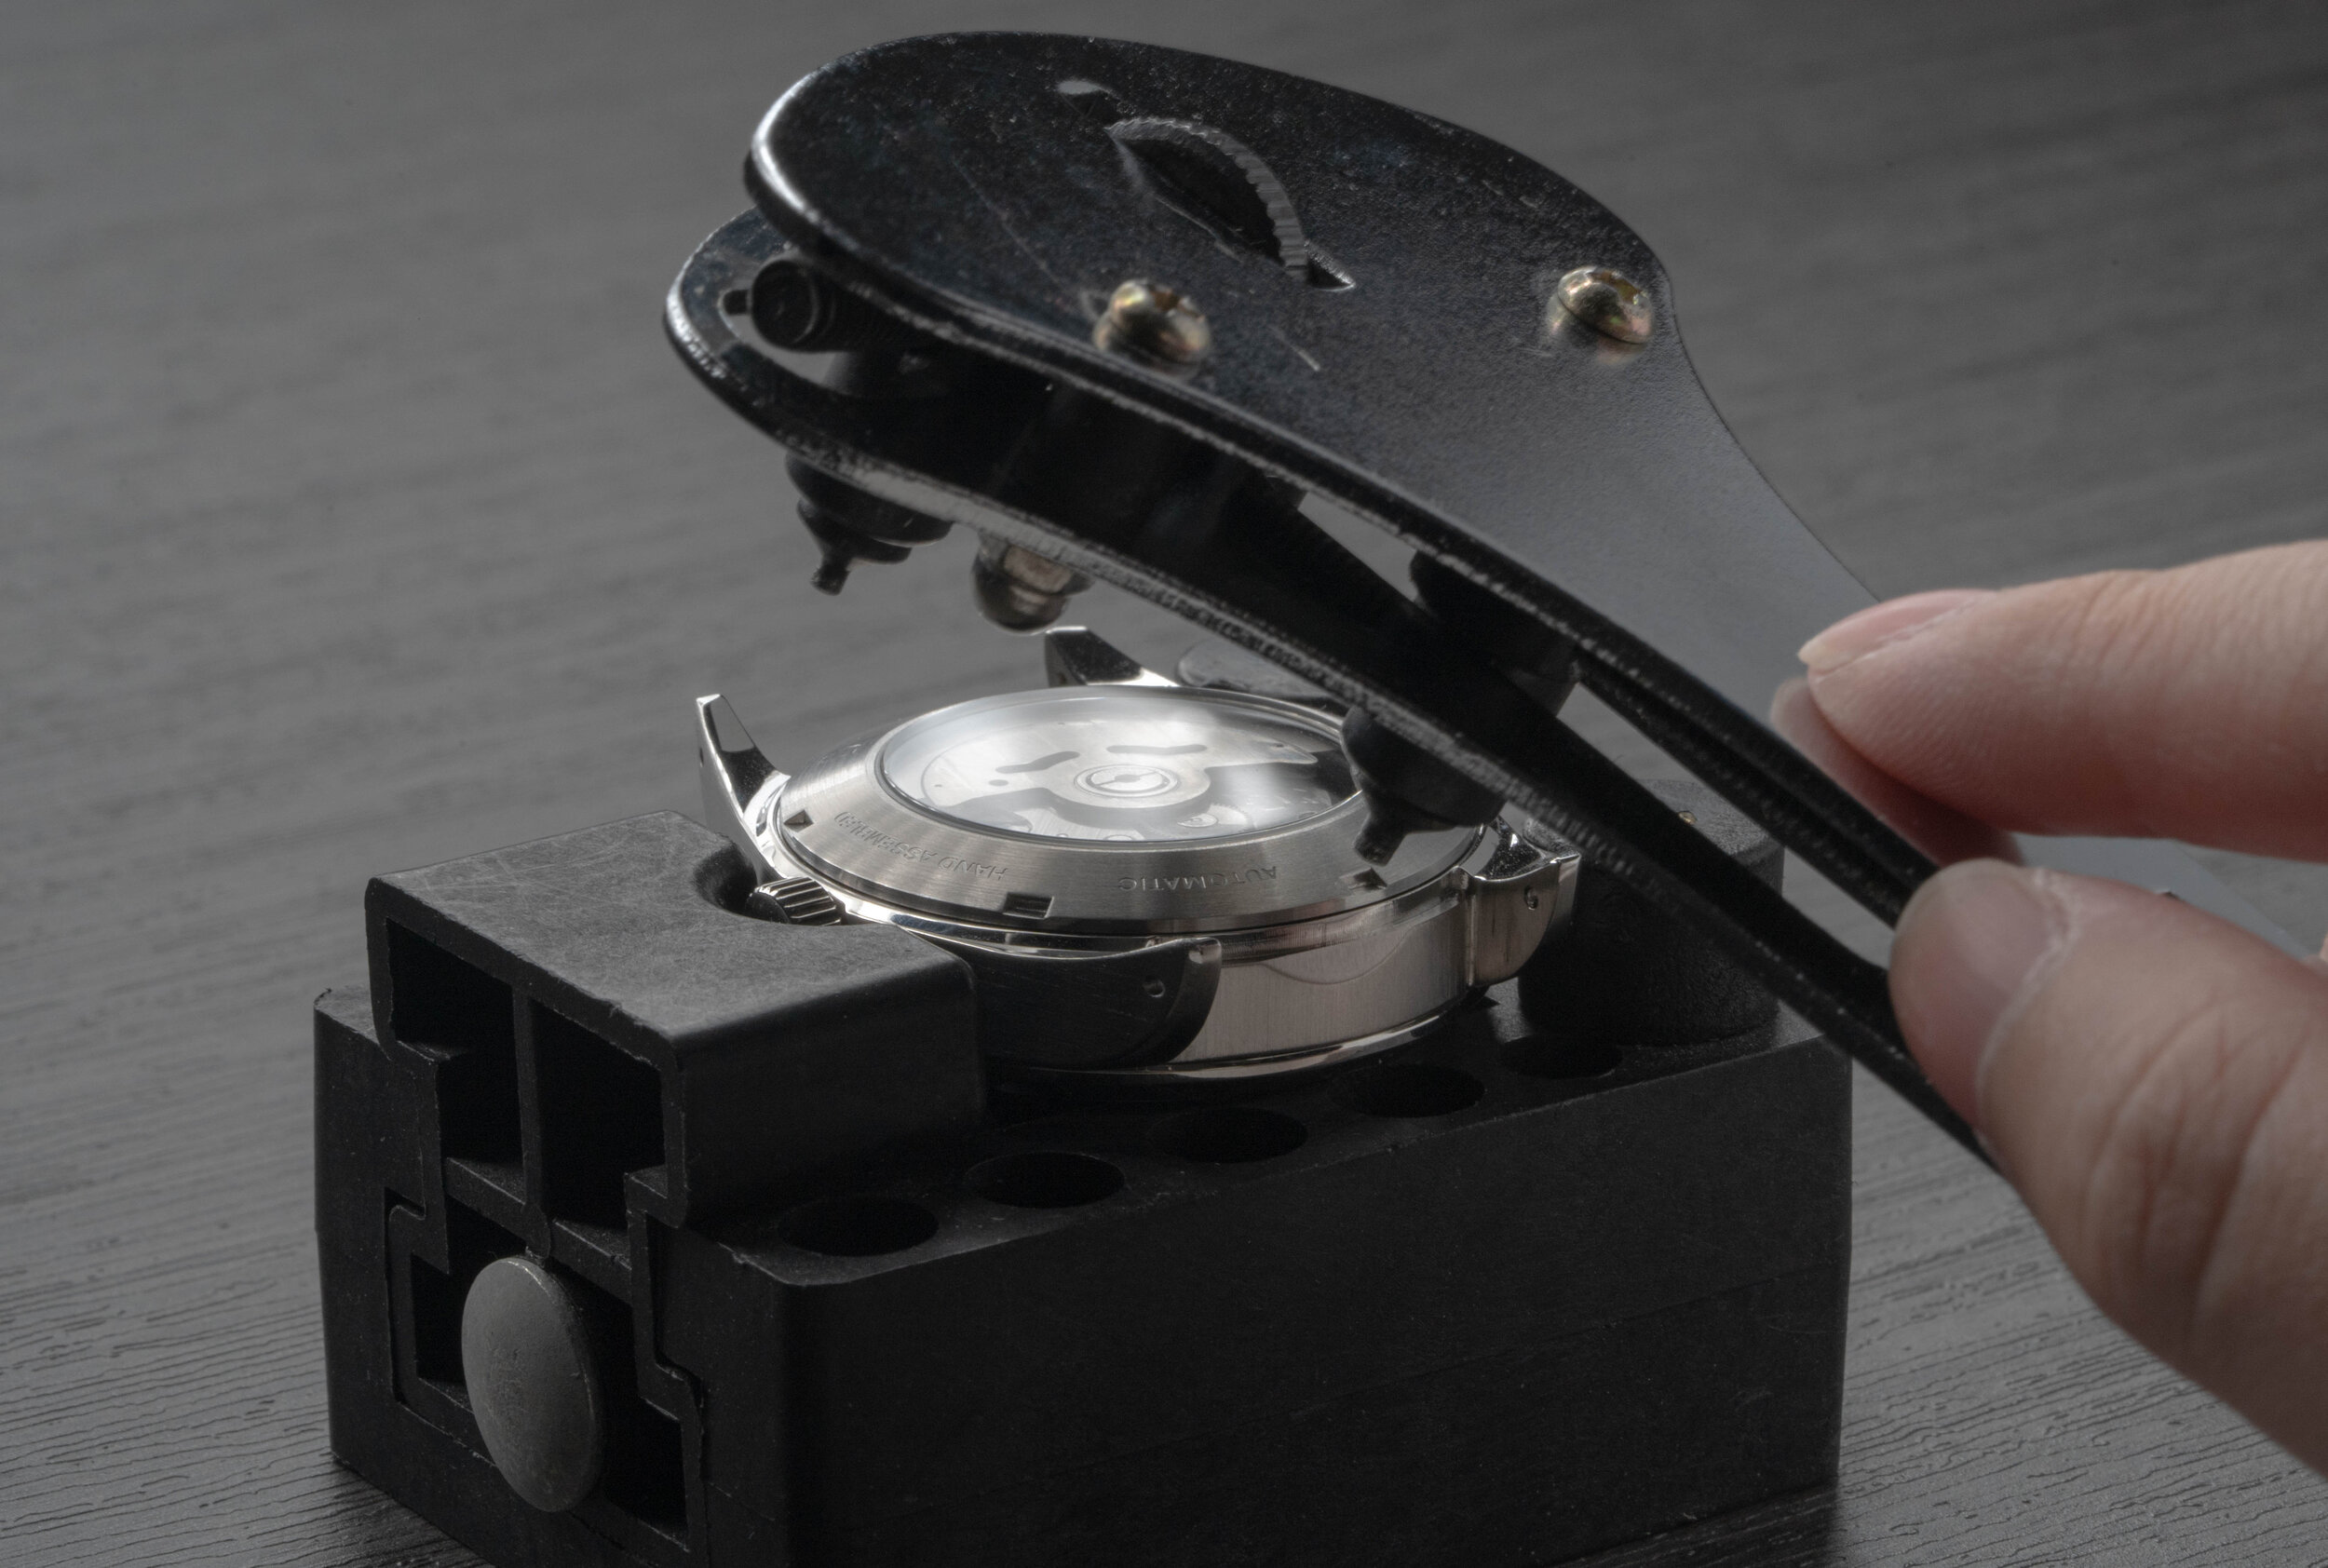
Before touching any tool, you must determine how your watch opens. Using the wrong method can crack the case or strip the threads, making repair impossible. There are four main types of case backs, and knowing yours prevents costly damage.
Snap-On Case Backs: Press-Fit Design
Snap-on backs are common in affordable quartz and fashion watches. The back is held in place by tension, not screws. Look for a thin seam around the edge or a small notch. If you see no visible screws or notches, it is likely a snap-back.
To open a snap-on case back, place the watch face-down on a microfiber cloth. Insert a thin flat tool such as a small flathead screwdriver, case knife, or even a butter knife into the notch. Gently twist to create a gap, then rotate the tool around the edge to release tension evenly. Never force the back off, as bending the case ruins the seal and can crack the glass.
Screw-Down Notch-Type Backs: Water-Resistant Seals
Screw-down backs are found in dive watches and water-resistant models. These backs have notches around the rim but no visible screws. They screw directly into the case, so you must turn counter-clockwise to open them.
Use a two-point or three-point case wrench that fits snugly into the notches. Place the watch on a soft pad and turn slowly with steady pressure. If you do not have a wrench, a rubber ball can provide grip. Simply press it firmly against the case and twist. Never use pliers, as they can scar the case and ruin water resistance permanently.
Screw-Back Cases: Visible Screws Around the Edge
Screw-back cases are secured by 2 to 6 small screws around the perimeter. These are common in higher-end quartz watches and some vintage models.
Use a precision screwdriver that matches the screw head exactly. Phillips and flathead sizes both appear in watch applications. Remove each screw carefully and place them on a magnetic mat or in a labeled tray to avoid losing them. Lift the back gently after all screws are removed. Never pry the back off, as this can damage the sealing surface.
Twist-On Coin-Style Case Backs: Simple Quarter-Turn
Twist-on backs have a grooved edge designed for a coin or coin-turn tool. You will often see open and close arrows engraved on the case.
Insert a standard quarter into the groove and turn counter-clockwise to open. These backs are easy to open and close without special tools, making them ideal for beginners. Avoid using pliers or excessive force, as this can deform the grooves and make closing difficult.
Gather the Right Tools and Replacement Battery
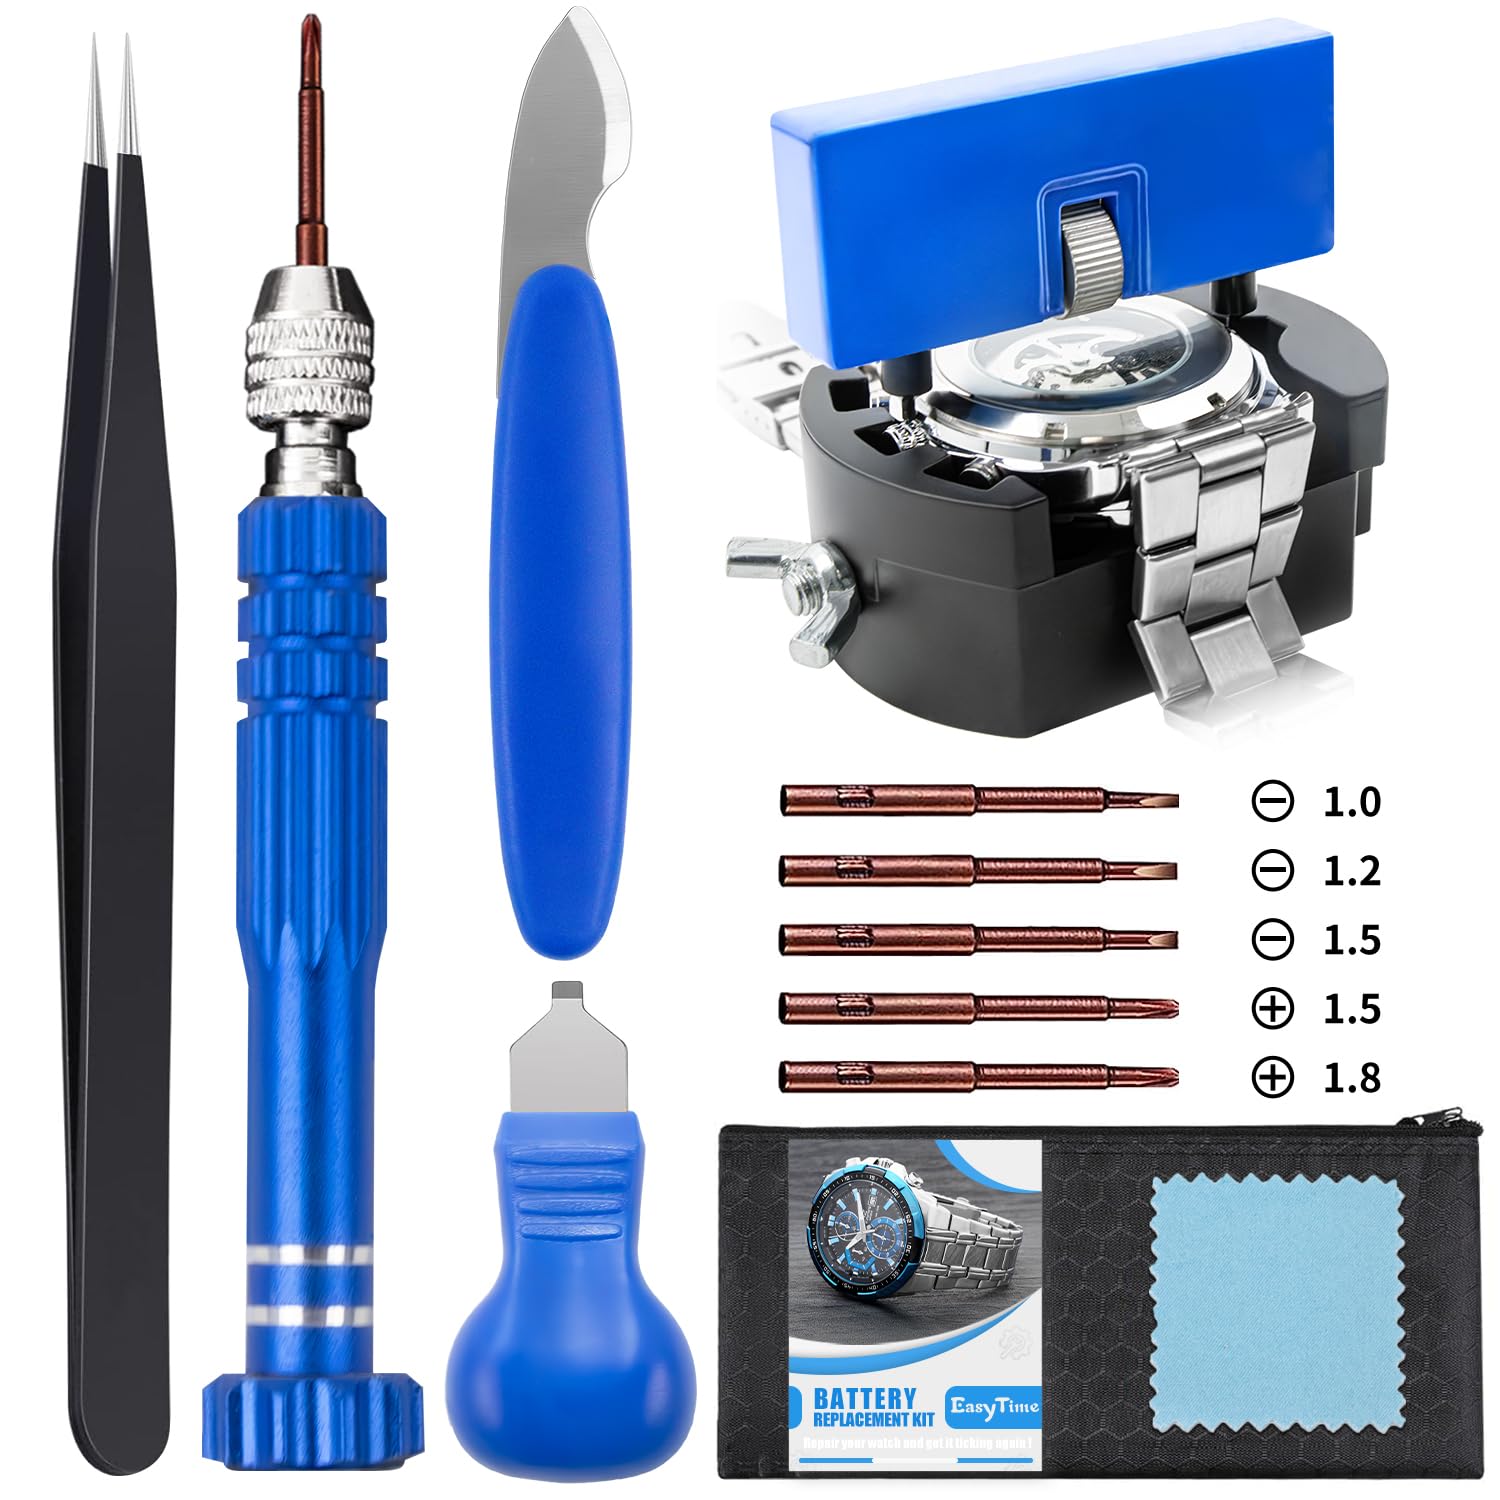
Using improper tools risks short circuits, scratches, or permanent damage to your watch movement. Prepare everything before starting, and never skip the essential safety steps.
Essential Tools for Safe Battery Replacement
You need specific tools to change a watch battery safely at home. The right equipment makes the difference between success and a damaged timepiece.
Gather these essential tools before starting your battery replacement project. Non-metallic tweezers with plastic or ceramic tips prevent electrical shorts and protect delicate components. A precision screwdriver set with 1.5 to 3 millimeter tips handles screw-back cases and small components. A thin flat tool or case knife pries open snap-on backs. A two-point case wrench opens notched screw-down backs. A soft work surface such as a microfiber cloth or silicone mat protects the watch and catches small parts.
Never use metal tweezers, as they can bridge electrical contacts and fry the movement. Never use pliers on the case, as they leave permanent marks and can crack the case.
How to Find the Correct Replacement Battery
The replacement battery must match exactly in size, voltage, and chemistry. Using the wrong type can damage the movement permanently. Check the old battery before removal. It is labeled with a code such as SR626SW, CR2032, or 373.
Take a photo of the old battery and movement before removal as a reference. Measure the battery with calipers if the label is worn. Search online using your watch model and the phrase battery type. Check under the plastic cover, as some watches print the battery type directly on the movement.
Common Watch Battery Types and Their Uses
Different battery chemistries serve different watch types. Matching correctly prevents damage and ensures optimal performance.
Silver-oxide batteries such as SR626SW deliver 1.55 volts and power slim quartz and dress watches. Lithium batteries such as CR2032 provide 3.0 volts and run digital watches and calculators. Alkaline batteries such as LR44 offer 1.5 volts and appear in low-cost watches and toys. Never substitute silver-oxide for alkaline or vice versa, as voltage differences can damage the movement.
Buy quality batteries from Renata, Energizer, Panasonic, or Maxell. These brands last longer and leak less than generic options. Purchase in packs of 5 to 10 to save money and have spares on hand. Store unused batteries in a cool, dry place away from metal objects.
Open the Watch Case Safely
With your tools ready and battery identified, it is time to open the watch. Work slowly and deliberately to avoid damaging the case or movement.
Open Snap-On Case Backs Without Damage
Place the watch face-down on a soft cloth. Locate the notch or seam around the case edge. Insert your thin flat tool into the gap and gently twist to create separation. Rotate the tool around the edge to release tension evenly, then lift the back off without forcing it.
If the back is stuck, try warming the case edge with your fingers. Body heat expands metal slightly and can help release the pressure. Never use heat guns or water on the watch.
Remove Screw-Down Notch-Type Backs
Use a case wrench that fits the notches snugly. Place the watch on a non-slip surface. Turn counter-clockwise with steady pressure until the back loosens. Once loose, remove the back by hand.
If the wrench slips, wrap a rubber band around it for better grip. The rubber increases friction and prevents sliding.
Unscrew Screw-Back Cases Properly
Select the correct precision screwdriver for your screw type. Remove screws one by one, placing them in order on your magnetic mat. Gently lift the back after all screws are removed. Never pry or force the back, as this damages the sealing surface.
Store screws securely. Use a magnetic mat or labeled tray to keep them organized. Mixing up screw sizes causes reassembly problems.
Open Twist-On Case Backs with a Coin
Insert a quarter into the groove. Turn counter-clockwise until the back loosens. Lift the back off carefully. No tools are needed for this type, making it perfect for beginners.
Remove and Replace the Battery
With the case open, swap the battery quickly. Limit exposure to dust and moisture, as both can damage the movement.
Remove the Old Battery Safely
Note the battery model number and orientation before removal. If a plastic cover or silicone shield is present, lift it gently with tweezers. Release the retaining clip, spring, or screw using a plastic tool or tweezers. Use non-metallic tweezers to lift the battery out.
Never touch the movement with fingers or metal tools. Skin oil and static electricity can damage sensitive components. Work quickly but carefully to minimize exposure.
Install the New Battery Correctly
Confirm polarity before inserting. Most watches require the positive side up, meaning the flat side faces up. Match the orientation of the old battery exactly. Insert the new battery gently but firmly into the compartment. Re-engage the retaining clip or spring. Replace any protective cover.
Listen for a click. Some watches confirm proper seating with an audible sound. If you do not hear or feel a click, remove and reinsert the battery.
Test Before Closing the Case
Check function before sealing if possible. Analog watches should show the second hand moving smoothly, ticking once per second. Digital watches should display bright, responsive screens.
If nothing happens, recheck battery orientation. Reseat the battery firmly. Clean contacts with a dry Q-tip. Try a fresh battery if problems persist.
Reassemble and Seal the Watch Properly
Closing the case correctly ensures longevity and maintains water resistance if applicable.
Snap the Back Into Place
Align the back perfectly with the case. Press evenly around the edges until it clicks into place. Use a watch back press tool if available. Press clockwise with a cloth over the back for even pressure.
Check that the back is flush and gap-free. If you see any space between the case and back, reseat it before proceeding.
Reattach Screw-Down Notch Backs
Align the back and hand-tighten clockwise. Use the case wrench to snug it firmly but do not overtighten. Ensure the back is fully seated and flush with the case.
Overtightening strips threads or damages the gasket. Hand-tighten with the wrench until snug, then stop.
Reinstall Screw-Back Cases Securely
Align the back and insert all screws. Tighten in a crisscross pattern, like lug nuts on a car wheel. This ensures even pressure across the entire back. Snug the screws firmly but never force them.
Never skip screws. Uneven pressure warps the case and compromises the seal.
Close Twist-On Case Backs with Care
Align the grooves with the case. Twist clockwise until snug. Do not use tools for this step. Hand-tightening is sufficient and prevents damage to the grooves.
Test Function and Check for Issues
After reassembly, verify your watch works and is sealed properly.
Verify Timekeeping and Display
Analog quartz watches should show the second hand ticking smoothly once per second, not stuttering or jumping. Digital watches should display bright, complete screens with no missing segments. Chronograph watches need all sub-dials and reset functions tested.
If the watch stops after a few minutes, the battery may be weak or the movement may be damaged. Try a fresh battery first.
Troubleshoot Common Post-Replacement Problems
Watch won’t start. This usually means wrong polarity, poor contact, or a dead battery. Reopen the case, check orientation, clean contacts, and try a new battery.
Second hand jumps or stutters. This indicates a weak battery or poor seating. Reseat the battery or replace it with a fresh one.
Case back will not close. This happens from misalignment, debris, or a damaged gasket. Inspect for obstructions and do not force the back closed, as this cracks the case.
Water inside the case. This means the gasket is damaged or missing. Stop using the watch immediately and seek professional repair.
DIY battery replacement often voids water resistance. Avoid submerging the watch unless it has been professionally resealed.
When to Skip DIY and See a Professional
Not every watch is suitable for home repair. Knowing when to stop prevents costly mistakes.
Seek Professional Help If Your Watch Is a Luxury or Vintage Timepiece
Luxury watches from brands such as Rolex, Omega, or Patek Philippe require professional handling. These watches have delicate movements that amateur tools easily damage. Vintage watches often have unique case designs that complicate opening.
Water-Resistant and Dive Watches Need Professional Resealing
Watches rated for 30 meters or more require gasket replacement and pressure testing after battery changes. DIY replacement compromises water resistance. Professional service costs $10 to $30 and includes the battery, gasket, and pressure test.
Signs You Need Professional Repair
Seek expert help if the case back is stuck, stripped, or damaged. Battery replacement that fails twice indicates a deeper problem. Signs of internal damage such as corrosion, moisture, or fogging require professional attention. An active warranty may be voided by DIY repair.
If you are uncertain about the case type or procedure, consult a professional instead of risking damage.
Final Tips for Successful Watch Battery Replacement
Take photos at each step. They serve as your undo button if something goes wrong. Work face-down to minimize dust entering the movement. Use lint-free gloves to prevent oil transfer onto components. Label screws if multiple sizes are involved.
Dispose of old batteries properly. Take them to a recycling center or electronics store. Never throw batteries in regular trash.
Practice on a cheap watch first if you are inexperienced. This builds confidence before working on a valuable timepiece.
Frequently Asked Questions About Changing Watch Batteries at Home
How Do I Know If My Watch Battery Needs Replacing?
Signs include complete stoppage, erratic second hand movement in 2 to 5 second intervals, dim or flickering digital displays, and timekeeping inaccuracy. Many quartz watches have an end-of-life indicator where the second hand moves every 4 seconds instead of every 1 second.
Can I Use Any Battery Brand for My Watch?
No. You must match the exact battery type in size, voltage, and chemistry. Using the wrong battery damages the movement. Stick to quality brands such as Renata, Energizer, Panasonic, or Maxell for reliable performance.
How Do I Identify the Correct Battery for My Watch?
Check the old battery for its model number printed on the label. Take a photo before removal. Measure with calipers if the label is worn. Search online using your watch model and battery type. Some watches print the battery type under the plastic cover or on the movement.
What Tools Do I Need to Change a Watch Battery at Home?
Essential tools include non-metallic tweezers, a precision screwdriver set, a thin flat tool for prying, a two-point case wrench for screw-down backs, and a soft work surface. Quality tools prevent damage to the case and movement.
Does DIY Battery Replacement Void Water Resistance?
Yes, often. DIY replacement typically compromises water resistance because gaskets may be damaged or not replaced. Avoid submerging the watch after DIY service unless professionally resealed.
When Should I Take My Watch to a Professional Instead of DIY?
Seek professional help for luxury watches, vintage timepieces, water-resistant or dive watches, complex movements, stuck or damaged case backs, failed DIY attempts, visible internal damage, or active warranties.
Key Takeaways for Changing Your Watch Battery at Home
Changing a watch battery at home is a rewarding DIY project that saves money and extends your timepiece life. Identify your case back type before starting, as each type requires a different opening method. Gather the correct tools and match the replacement battery exactly in size, voltage, and chemistry. Work in a clean, well-lit area and handle the movement carefully to avoid damage.
Test your watch before and after sealing the case. Reassemble carefully, ensuring the back is flush and gap-free. Avoid submerging water-resistant watches after DIY service. When in doubt, consult a professional for luxury or complex timepieces. With patience and the right approach, most watch battery replacements take under 10 minutes and cost only the price of the battery.



