Changing a leather watch band is one of the simplest upgrades you can make to your timepiece. Whether you want to match a new outfit, replace a worn strap, or switch from a casual style to something more formal, swapping out your leather band takes fewer than five minutes with the right technique. The process hinges on understanding spring bars, those small metal pins that lock your strap into the watch lugs, and ensuring your new strap matches your watch’s lug width. This guide walks you through every step, from gathering tools and removing the old band to installing your new strap and keeping the leather looking its best.
Gather Essential Tools for Watch Band Replacement
Tools You Need Before Starting
You only need a few basic items to change a leather watch band successfully. Having the right tools prevents scratches and makes the process much smoother.
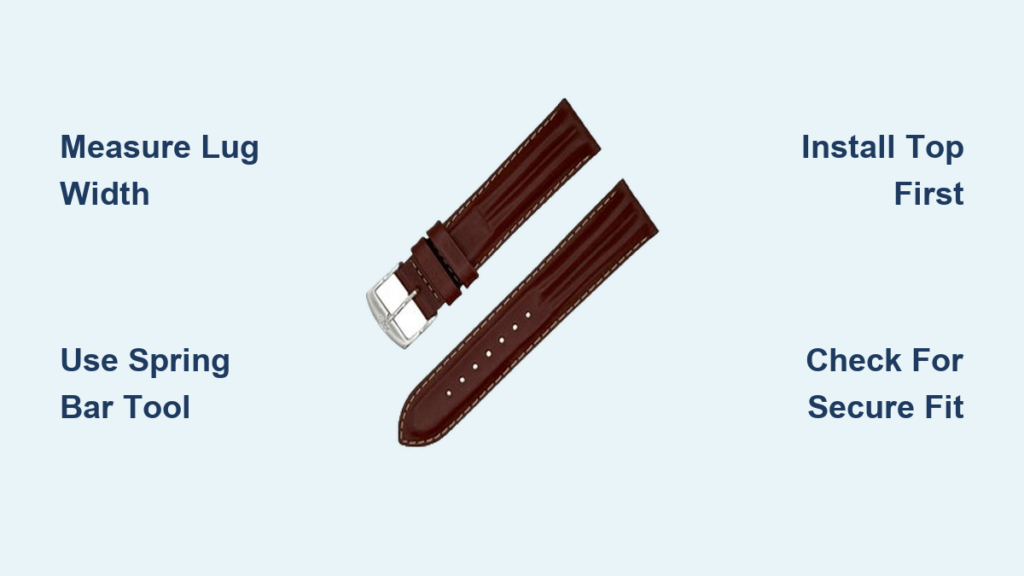
• Spring bar tool: A forked precision tool that compresses spring bars safely. This is your most important investment.
• Soft microfiber cloth: Protects the watch crystal and case from scratches during handling.
• New leather strap: Must match your watch lug width, typically 18mm, 20mm, or 22mm.
• Replacement spring bars: Optional but recommended. Originals can be reused unless bent or lost.
Pro Tip: Work over a tray or cloth with raised edges to catch spring bars if they pop out unexpectedly.
Check Your Watch Compatibility First
Before purchasing a new strap, confirm your watch specifications. The most critical measurement is lug width, which is the distance between the two lugs where the strap attaches. Measure this with a ruler or caliper, or check your watch manual. A mismatched strap width causes gaps, wobbling, or complete incompatibility.
Understand How Spring Bars Work

The Role of Spring Bars in Strap Installation
Spring bars are small metal pins with spring-loaded ends that secure your strap to the watch case. When you compress them with the spring bar tool, they shorten just enough to slide in or out of the lug holes. Once released, the springs expand to lock the strap in place. Most spring bars are 1.8mm or 2.0mm in diameter, with length varying based on lug width.
Locate the Watch Lugs and Strap Orientation
Watch lugs are the protruding arms on the case where the strap attaches. Each lug has a small hole that accepts the spring bar end. You always access these from the back of the case. For strap orientation, the short end with the buckle attaches to the 12 o’clock lug at the top, while the long end connects to the 6 o’clock lug at the bottom and wraps around your wrist.
Visual Cue: The buckle should face inward when worn, and the strap should lay flat without twisting.
Remove Your Old Leather Strap Safely
Step-by-Step Removal Process
Follow these steps to remove your current leather band without damaging the watch.
- Lay the watch face-down on a soft cloth to protect the crystal.
- Locate the spring bar at one end of the strap where it connects to the lug.
- Insert the forked end of the spring bar tool into the gap between the strap and lug, aligning with the spring bar ridge.
- Press inward to compress the spring bar toward the center of the watch.
- While holding compression, gently pull the strap away from the lug until the spring bar clears the hole.
- Repeat the process on the opposite side.
- Remove both spring bars from the old strap for reuse.
Warning: Never force the tool. If resistance occurs, reposition and apply steady pressure. Slipping can scratch or dent the lugs.
Common Mistake: Damaged Lugs From Rushing
The most frequent error is using excessive force or rushing the process. This causes the tool to slip, resulting in scratched cases or dented lug holes. Always work slowly, keep your hand steady, and use a soft protective surface beneath the watch.
Prepare the New Leather Strap for Installation
Insert Spring Bars Correctly
Take the spring bars and push them into the loops at each end of your new leather strap. Slide them in until the bar is centered, with both ends extending equally from the strap. Test the movement by compressing and releasing the spring bar with your fingers. It should compress smoothly and spring back with good tension.
Verify Strap Compatibility Before Proceeding
Hold the strap up to the watch lugs and confirm the spring bar ends align with the lug holes without stretching. The lug width must match exactly. A too-narrow strap creates gaps and poor tension, while a too-wide strap wobbles and risks detachment during wear.
Install the New Leather Strap
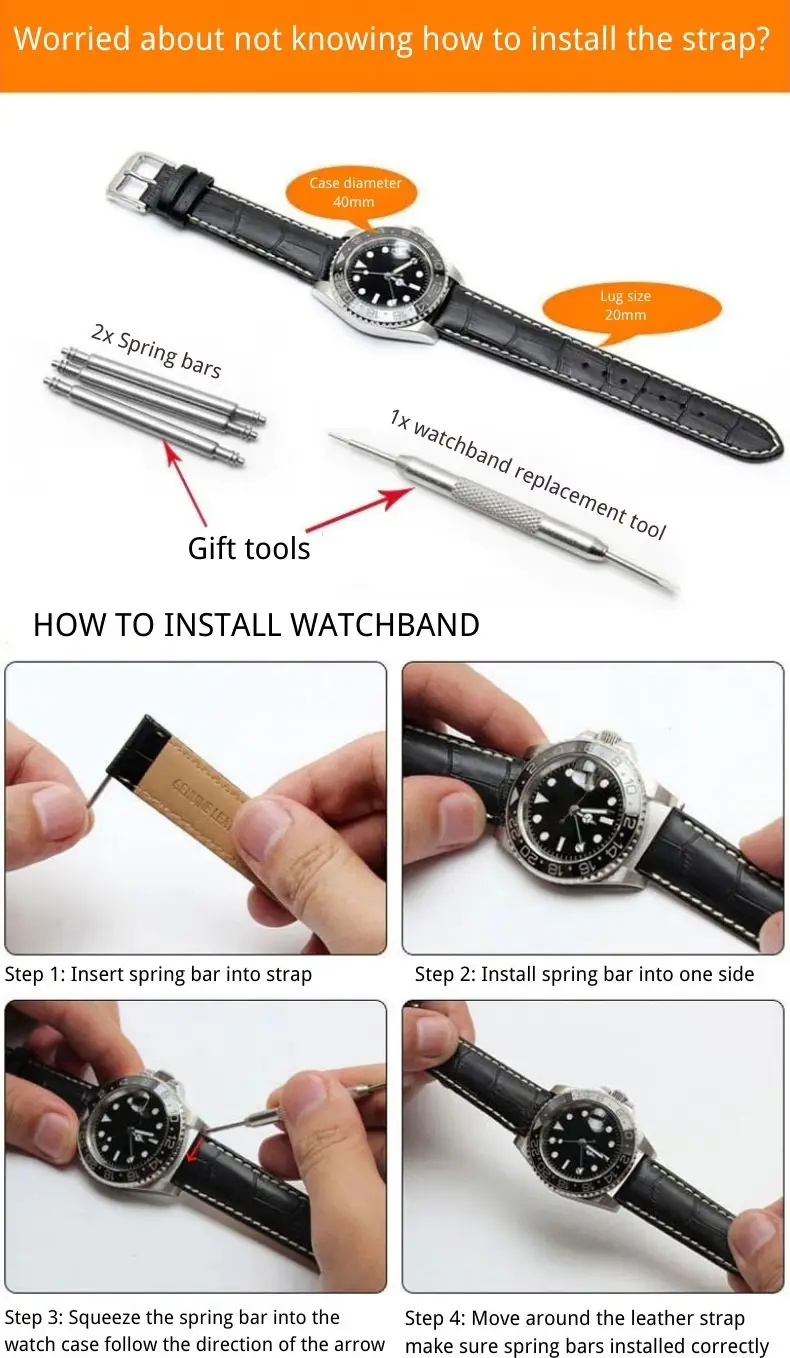
Attach the Top End First
Start with the short end that has the buckle. This is the 12 o’clock side of your watch.
- From the back of the watch, insert one end of the spring bar into the 12 o’clock lug hole.
- Use the spring bar tool to compress the free end of the spring bar.
- Guide it into the opposite lug hole until it snaps into place with an audible or tactile click.
- Gently tug to confirm the spring bar is secured.
Pro Tip: Wiggle the strap slightly while inserting. This helps align the spring bar with the hole.
Secure the Bottom End
Repeat the same process for the long end at the 6 o’clock lug. Compress the spring bar with your tool, slide it into place, and ensure it clicks. Once both ends are installed, gently tug on the strap to verify both sides are locked. The strap should have slight side-to-side movement, but it should not pull straight off.
Handle Special Cases Like Leather NATO Straps

Installing a Leather NATO Strap Properly
Leather NATO straps require a different approach than standard leather bands. Unlike nylon NATOs, leather NATOs should not be threaded through after spring bar installation because friction can scratch or tear the leather.
Correct method:
- Remove both spring bars from the watch completely.
- Unthread the long end of the leather NATO from the floating keeper.
- Slide the strap between the lugs with the buckle at the top.
- Reinsert the spring bars from the back, compressing each end into the lug holes.
- Thread the long end back through the floating keeper.
Note: This method also works for thick nylon straps on watches with tight case clearance.
Troubleshoot Common Problems
Spring Bar Won’t Snap Into Place
This usually happens when the bar is misaligned or not fully compressed. Recheck that the spring bar is centered in the strap. Fully compress with the tool and wiggle the strap into position until you feel or hear the click.
Strap Feels Loose or Wobbly
The spring bar may not be fully seated, or you may have the wrong lug width. Remove and reinstall the strap, confirming both ends click securely. Double-check that your strap lug width matches your watch specifications.
Scratched Case or Lugs
Tool slippage or working without a protective cloth causes this. Always use a soft surface, maintain control of your tool, and apply steady, measured pressure. A quality spring bar tool reduces this risk significantly.
Can’t Reach the Spring Bar
Tight clearance between the strap and case creates this problem. Use a slim or needle-point spring bar tool. For leather NATOs, remove the spring bars first before threading the strap.
Maintain Your Leather Strap Long-Term
Clean Without Damaging
Never soak leather in water because it causes cracking and discoloration. Use a pH-balanced leather cleaner like Fiebing’s or Lexol. Apply a small amount with a soft cloth, work gently into the leather, and buff dry with a clean section of the cloth. Note that cleaning may darken the leather, so test on a hidden area first.
Condition Regularly for Longevity
Apply leather conditioner every three to six months, depending on wear and climate. Conditioning restores oils lost to sweat, friction, and dry air. It prevents drying, stiffness, and premature wear, keeping your strap supple and comfortable.
Embrace the Patina
Leather develops a rich patina over time, including faded areas, soft creases, and color changes. These are signs of character and wear, not damage. The more you wear your strap, the better it looks.
Mindset: “Wear it and forget about it.” A well-loved strap tells a story.
Choose the Right Strap Type for Your Needs
Match Strap to Your Lifestyle
| Strap Type | Best For | Notes |
|---|---|---|
| Standard Leather | Dress watches, daily wear | Ages beautifully with patina |
| Leather NATO | Casual, active use | Durable two-layer design |
| Stitched Leather | Heavy-duty wear | Reinforced edges resist fraying |
| Smooth vs. Textured | Style preference | Affects grip and aging pattern |
Consider Buckle and Length Options
Tang buckles are standard and come in stainless steel, gold-plated, or black PVD finishes. Length options include standard fits for 150 to 200mm wrists, extended sizes up to 220mm, or custom lengths. The lining, whether suede or calf leather, affects comfort and breathability.
Follow Safety Best Practices
Work Smart to Avoid Mistakes
Always work on a clean, flat surface with good lighting. Keep spring bars in a small container to prevent loss. Never force components; if something resists, stop and recheck your alignment. Avoid exposing your strap to perfumes, lotions, or alcohol, which can damage the leather over time.
Pro Tip: Do this at a desk with proper lighting. Rushing leads to lost parts or damaged watches.
Final Installation Checklist
Before finishing, verify each step:
• Watch face-down on soft cloth
• Old strap removed safely
• Spring bars inserted into new strap and centered
• Top 12 o’clock end installed first
• Bottom 6 o’clock end secured
• Both sides click and hold firm
• Strap lies flat without twisting
• Leather cleaned and conditioned if desired
Frequently Asked Questions About Changing Leather Watch Bands
What tools do I need to change a leather watch band?
You need a spring bar tool with a forked end, a soft microfiber cloth, and a new leather strap that matches your watch lug width. Optional replacement spring bars are helpful to have on hand.
How do I know what size leather strap to buy?
Measure the distance between your watch lugs with a ruler or caliper, or check your watch manual. Common sizes are 18mm, 20mm, and 22mm. The strap width must match exactly for proper fit.
Can I reuse the spring bars from my old strap?
Yes, you can reuse spring bars unless they are bent, damaged, or lost. Inspect them for any signs of wear before reinstalling.
How often should I condition my leather watch band?
Condition your leather strap every three to six months, depending on how often you wear it and your climate. Regular conditioning prevents drying and extends the strap’s life.
Why won’t the spring bar snap into place?
This usually happens when the spring bar is misaligned or not fully compressed. Recheck the alignment, compress the spring bar fully with your tool, and wiggle the strap gently until it clicks.
Can I change a leather watch band without special tools?
Using a spring bar tool is strongly recommended. Attempting to use pins, tweezers, or other improvised tools increases the risk of slipping and scratching your watch case or lugs.
Key Takeaways for Changing Your Leather Watch Band
Changing a leather watch band is a simple, affordable project that takes under five minutes with the right technique. The most critical steps are confirming your lug width match, using a proper spring bar tool, and working slowly to avoid damaging your watch. Always install the 12 o’clock end first, ensure both spring bars click securely, and verify the strap lies flat without twisting. For maintenance, clean your leather with pH-balanced products and condition it every three to six months to keep it supple. Embrace the natural patina that develops over time, as it gives your strap character and tells the story of your wear.
Your watch deserves a strap that fits your style and lifestyle. Try different colors and textures, black for formal occasions, brown for casual wear, or tan for vintage charm. With this guide, you have everything you need to refresh your timepiece confidently.


