
A loose or tight watch strap can turn a prized timepiece into a daily annoyance. Whether your watch slides around your wrist or leaves marks after removal, how to adjust watch strap properly is essential for comfort, security, and style. A well-fitted strap should allow one finger to slide comfortably between the band and your wrist, with no excessive movement or pinching.
This guide covers every major strap type, offering step-by-step instructions, tool recommendations, and pro tips so you can resize your watch at home confidently. You’ll learn to identify your strap type, use the right tools, avoid common mistakes, and know when to seek professional help.
Identify Your Watch Strap Type Before Starting
Before making any adjustments, determine your watch strap type. Each requires a different method and tools. Misidentifying the band can lead to damage or improper fit.
Metal Bracelets With Removable Links
These are the most common on mid-to-high-end watches. Made of individual metal links connected by pins, they require pin removal to shorten or lengthen.
How to Spot It:
• Visible pins on the sides of links
• Small arrows on the underside indicating pin direction
• Typically found on stainless steel or titanium bands
Adjustment Goal: Remove or add links to match your wrist size.
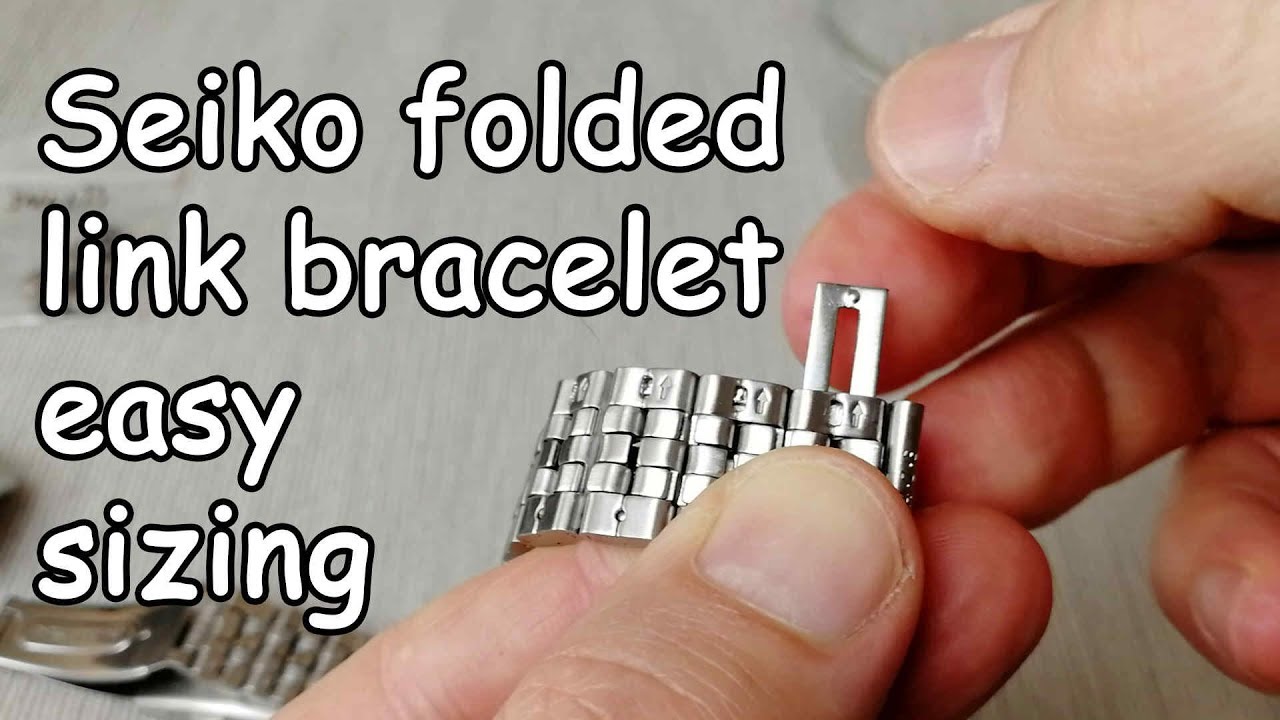
Folded Link Hidden Pin Bracelets
Common on Seiko and affordable automatics, these use folded metal tabs instead of pins. The links appear seamless with no visible pin holes.
How to Spot It:
• No pin holes, just smooth sides
• Arrows inside the links show disassembly direction
• Requires pushing, not hammering
Adjustment Goal: Slide folded tabs in or out to adjust length.
Mesh Sliding Clasp Straps
Used in Casio, Timex, and some dress watches. These are continuous metal bands with a sliding clasp mechanism for micro-adjustment.
How to Spot It:
• No links, just a smooth woven metal surface
• A clasp with a pin that locks into different positions
• Often labeled “Adjustable Mesh” or “Expansion Band”
Adjustment Goal: Move the pin up or down along the mesh for a snug fit.
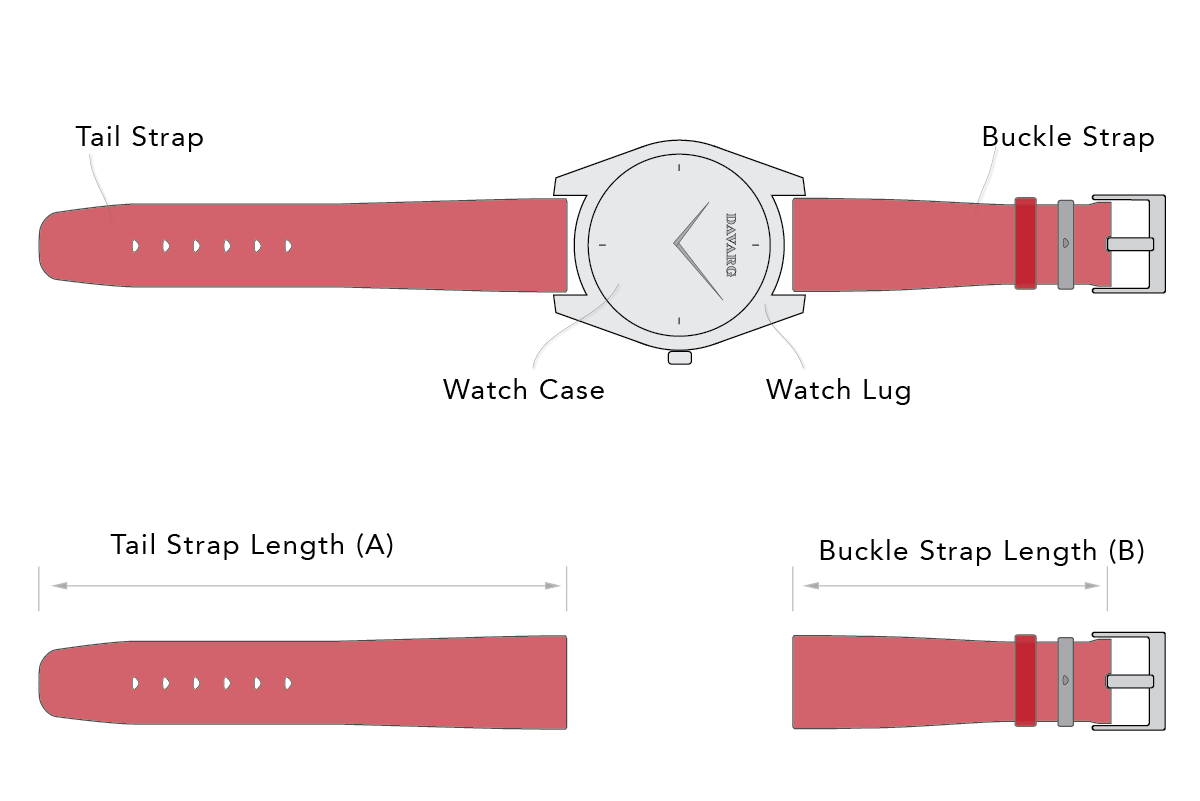
Leather, Rubber, and NATO Straps
These use non-mechanical methods: pre-punched holes, trimming, or threading.
How to Spot It:
• Leather has multiple holes near the buckle
• Rubber uses one-piece design with trimmable ends
• NATO is a single long strap that threads through both lugs
Remove Links From Metal Bracelets Step by Step
Adjusting a traditional metal bracelet requires precision. Done right, it lasts years. Done wrong, you risk losing a pin or damaging the band.
Tools You Need
• Pin pusher tool or pushpin and hammer
• Wood block with notch to support the band
• Needle-nose pliers
• Soft cloth to protect the watch face
Pro Tip: A dedicated pin pusher tool gives better control and reduces scratch risk.
Step-by-Step Process
-
Lay the Watch Flat: Place the bracelet on a soft cloth with the side facing up where you’ll remove the pin.
-
Find the Arrows: Flip the band over. Look for small arrows on the inside of the links. These show the direction to push the pin out.
-
Align the Pin Pusher: Position the tool’s tip on the pin head, aligned with the arrow direction.
-
Push the Pin Out: Turn the tool’s screw clockwise. Apply steady pressure until the pin slides out about 70%. Use pliers to pull the rest if needed.
-
Remove the Link: Once the pin is out, separate the link. Keep the pin safe because it’s reusable.
-
Reinsert the Pin Split Side Out: Insert the pin from the opposite side, ensuring the split end faces outward. This allows the pin’s spring to lock into the link.
-
Seat the Pin Fully: Use the tool or a light hammer tap to push the pin until it’s flush. You should hear a slight snap when it locks.
Warning: Never insert the pin backward. The split side must face outward or the pin will loosen over time.
Common Mistakes to Avoid
• Using a knife or paperclip which can scratch or bend the pin
• Removing too many links at once; test fit after each removal
• Hammering too hard which can deform the link or break the pin
• Ignoring the arrows because pushing the wrong way damages the pin channel
Adjust Folded Link Bracelets Without Damaging Them
These bands look like solid metal but use folded tabs that slide in and out, with no pins involved.
Tools You Need
• Awl or thin flat screwdriver
• Cloth-wrapped pliers for stubborn links
• Soft work surface
Step-by-Step Process
-
Follow the Arrows: Flip the band. Arrows show which way to push the tab out.
-
Press the Nubbin: Use the awl to apply firm pressure on the raised edge where the tab folds.
-
Slide the Link Out: Push in the arrow direction until the tab releases. It may take significant force.
-
Remove the Link: Once free, slide the entire link out.
-
Reconnect and Test: Slide the tab back in until it clicks. Tug gently to confirm it’s secure.
Expert Note: Do not hammer or drill. This is not a pin system; only directional pressure works.
Why It’s Tricky
• Tabs can be very tight, especially on new watches
• Finish scratches easily; always protect with a cloth
• Some models require pulling both sides simultaneously
Resize Mesh and Expansion Straps Quickly
These are ideal for small or tight wrists, offering smooth continuous adjustment.
Tools You Need
• Flat screwdriver or pin remover tool
• Wooden stick for safer pressure application
Step-by-Step Process
-
Open the Clasp: Insert the tool into the small hole near the clasp hinge.
-
Push the Pin Up: Lift the pin upward to release the sliding mechanism.
-
Adjust the Length: Slide the pin up for tighter or down for looser fit along the mesh.
-
Reinsert the Pin: Push it back in until it clicks or contacts the inner wall.
-
Test the Fit: Close the clasp and check for smooth operation.
Casio Tip: Look for a small arrow marking the adjustment point. A click means it’s locked.
Troubleshooting Common Issues
• Clasp won’t close: The mesh may be too thick at that point. Move the pin slightly left or right to a thinner section.
• Pin won’t seat: Use a wooden stick to apply even pressure without marring the metal.
• Band slips: Ensure the pin is fully inserted and the clasp snaps shut securely.
Customize Leather and Rubber Straps
These straps do not use links but they’re still adjustable with the right technique.
Adjust Leather Straps
Most leather bands have three to five pre-punched holes. Choose the one that fits snugly.
Add New Holes:
1. Pick a spot between existing holes for fine-tuning.
2. Use a leather hole punch to align and press firmly to create a clean hole.
3. Keep holes at least 2-3mm from the edge to prevent tearing.
Pro Tip: Use an awl to guide the buckle through tight holes without fraying the leather.
Trim Rubber or Silicone Straps
Common on dive and sports watches, these can be shortened safely.
Step-by-Step:
1. Wrap the strap on your wrist and mark where it overlaps.
2. Cut straight or at a slight angle with sharp scissors for a clean finish.
3. Lightly pass a flame over the cut end to prevent fraying, only if the strap allows it.
Warning: Not all rubber tolerates heat. Test on a small area first.
Install and Adjust NATO Straps
NATO straps are tool-free, highly adjustable, and secure.
Step-by-Step Threading
- Attach one spring bar to the top lugs and the other to the bottom.
- Pass the long end through the bottom bar, then over the watch case.
- Feed the end through the top bar and tuck excess into the keepers.
- Pull until the watch sits snugly. The case should rest between your wrist and the strap.
Security Benefit: Even if one spring bar fails, the strap stays on.
Why Users Love NATO Straps
• No resizing tools needed
• Fits almost any wrist
• Durable and interchangeable
• Ideal for active use
Essential Tools for Every Strap Type
Using improper tools can damage your watch. Here is what you really need.
Must-Have Tools by Strap Type
| Strap Type | Essential Tools |
|---|---|
| Metal Link | Pin pusher, wood block, pliers |
| Folded Link | Awl, thin screwdriver |
| Mesh | Flat screwdriver, pin remover |
| Leather | Leather hole punch |
| Rubber | Sharp scissors |
| NATO | Spring bar tool |
Universal Rule: Always work on a soft cloth to protect the crystal and case.
Budget-Friendly Alternatives
• No pin pusher: Use a pushpin and hammer
• No awl: A thin nail works for folded links
• No hole punch: A hot needle can make small holes in leather, use caution
When to Leave It to a Professional Jeweler
Some adjustments are best left to experts.
Go to a Watchmaker If
• You own a luxury watch such as Rolex, Omega, or Patek Philippe
• The band has a butterfly clasp or hidden deployant
• You’re unsure of the strap type
• The pins are corroded or stuck
• The band is stretched or damaged
Cost: Most jewelers charge $10-$15 for resizing.
Free Resizing at Purchase
Many Authorized Dealers offer free strap adjustment when you buy a watch. Always ask before leaving the store.
Maintain Your Strap for Years of Comfort
A proper fit lasts longer when you care for it.
Cleaning Tips by Material
• Metal: Wipe with damp cloth, dry immediately
• Leather: Condition monthly, avoid water
• Rubber: Wash with mild soap, air dry
• Fabric: Hand wash, lay flat to dry
Storage Tips
• Keep in a watch box or roll
• Store leather away from sunlight to prevent fading
• Loosen straps occasionally if worn daily
Key Takeaways for Achieving the Perfect Watch Fit
Knowing how to adjust watch strap properly transforms your wearing experience. Whether you’re shortening a metal bracelet, sliding a mesh clasp, or trimming a rubber band, the process is simple with the right knowledge and tools. Always start by identifying your strap type, follow the arrows, and work slowly to avoid damage.
For most standard watches, DIY adjustment is safe and effective. But for high-value pieces or complex clasps, a $15 trip to a jeweler is worth the peace of mind. With proper care, your watch will stay secure, comfortable, and stylish for years.
Frequently Asked Questions About Adjusting Watch Straps
How do I know if my watch strap needs adjusting?
Your watch needs adjustment if it slides excessively on your wrist, leaves indentations after removal, or sits too tightly causing discomfort. The ideal fit allows one finger to slide comfortably between the strap and your wrist.
Can I adjust a watch strap without special tools?
Yes, certain types require no tools. NATO straps adjust by threading and pulling. Mesh straps use a simple sliding mechanism. Leather straps often have pre-punched holes. Metal link bracelets require a pin pusher or pushpin, but these are inexpensive.
What happens if I put the pin in backwards?
Inserting a metal bracelet pin backwards with the split side facing inward will cause it to loosen over time. The pin will eventually fall out, risking loss of your watch. Always ensure the split side faces outward when reinserting.
How many links should I remove at once?
Remove one link at a time and test the fit before removing more. Removing too many links at once can result in a watch that’s too tight to wear. Work slowly and check frequently.
Can I adjust a watch strap that’s too small?
For metal bracelets, you can add links if you kept the removed ones. For leather and rubber straps, you’re limited to using existing holes or creating new ones. If the strap is permanently too short, consider replacing it with a longer size.
Should I pay for professional watch strap adjustment?
Pay for professional adjustment if you own a luxury watch, have a complex clasp mechanism, or feel unsure about the process. Most jewelers charge $10-$15, and many authorized dealers offer free adjustment at the time of purchase.


