If you’ve tried to swap the band on your Garmin Lily only to find the pins won’t budge, you’re not alone. Unlike most smartwatches that use spring bars, the Garmin Lily features a unique twist-lock pin system that requires a specific technique to remove and reinstall. Many users struggle at first, often damaging tools or scratching the case, because the process isn’t clearly explained in the manual. This guide gives you the exact steps, tools, and insider tips from real users and official sources to safely change your Garmin Lily watch band without frustration or damage.
Gather the Right Tools First
Official Wrench Tools Are Essential
Garmin includes specialized wrench tools with every official band replacement kit. These small, forked metal tools are designed to fit precisely into the recessed ends of the Lily’s locking pins. Do not attempt band removal without them because standard watch tools won’t work. The design allows you to rotate both pins simultaneously in opposite directions, which is required to unlock the mechanism.
Never Use Pliers or Improvised Tools
Some users turn to jewelry pliers or tweezers when the wrench slips, but this risks scratching the lugs or deforming the soft metal pins. One verified user shared that they bought pliers thinking it would help and ended up scratching the side of their watch while almost stripping the pin. Stick to Garmin’s tools or request new ones if needed.
Get Free Replacement Tools from Garmin
If your included tools don’t grip the pins properly, visit the Garmin support website and search for Lily band tool replacement. Submit a request via chat or email. Multiple users confirm that Garmin mails corrected tools at no cost, often within a few business days. This is part of their goodwill support for a widely reported issue.
Understand the Twist-Lock Pin System
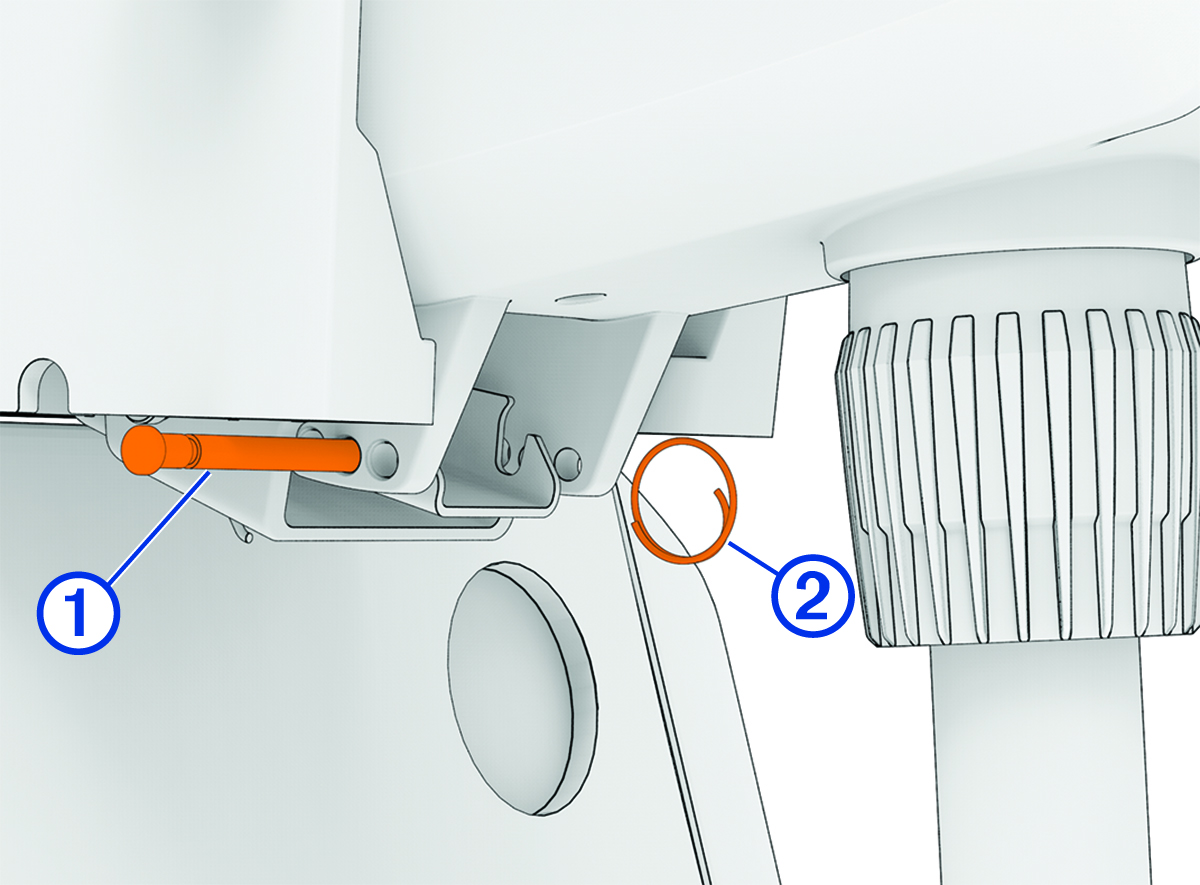
It’s Not a Spring Bar, It’s a Threaded Lock
The Garmin Lily does not use push-in spring bars like most watches. Instead, each band attachment is a dual-ended pin with opposing threads. To release it, you must rotate one end clockwise and the other counterclockwise at the same time. Think of it as unscrewing a bolt from both sides. One experienced user described it perfectly: it’s not a pin you push out, it’s a screw you twist open.
The Pins Are Reused, Don’t Throw Them Away
The pins are not disposable. You’ll remove them during replacement and reuse them with the new band. Keep them in a small container or magnetic tray to avoid losing them. If a pin becomes stripped, contact Garmin for replacements instead of forcing a damaged one.
Remove the Old Band Step by Step
Prepare Your Workspace
Work on a clean, soft surface like a microfiber cloth to protect the watch face. Use good lighting and a magnifier if needed. Have your new band, tools, and a small dish ready to store pins safely.
Rotate Pins in Opposite Directions
- Insert one end of the wrench tool into the left pin’s recess.
- Insert the other end into the right pin.
- Apply gentle pressure while rotating.
- Turn the left pin counterclockwise and the right pin clockwise.
- You’ll feel slight resistance as the threads disengage.
- Once loose, push the pin outward from the inside of the lug.
When unlocked, the pin will slide out smoothly. If it’s stuck, double-check your rotation direction.
Remove the Band Completely
After removing the first pin, the band will detach from one side. Repeat the process on the opposite lug to fully separate the watch body. Keep both pins safe because they’re reused with the new band.
Install the New Band Correctly

Align Band with Grooved Lugs
Position the new band so its attachment holes align with the grooved lugs on the watch case. Make sure the band sits flat and the orientation is correct, such as the logo facing outward for silicone bands.
Insert Pin from Outside to Inside
Take one saved pin and insert it from the outside edge of the lug toward the center. Slide it through until it emerges slightly on the inside. This ensures proper alignment with the wrench tool for locking.
Lock Pin with Opposite Rotation
- Place the wrench tool onto both ends of the pin.
- Rotate the left side clockwise and the right side counterclockwise.
- Turn until you feel firm resistance, which means the threads are engaged and locked.
Do not over-tighten because excessive force can crack the watch housing or strip the threads.
Repeat on the Second Side
Follow the same steps for the other side. Insert the pin from outside to inside, use the wrench to rotate ends in opposite directions, and confirm a secure fit before moving on.
Final Check and Fit Test
Verify Both Pins Are Secure
After installation, gently tug on both sides of the band. It should not loosen or wobble. If the band moves, the pins may not be fully locked. Recheck alignment and re-engage the threads.
Inspect for Gaps or Misalignment
Look closely at where the band meets the watch case. There should be no visible gaps or uneven spacing. A flush fit ensures durability and prevents accidental detachment during use.
Ensure Smooth Band Movement
If using a metal mesh or bracelet band, confirm it pivots freely. A binding band may indicate incorrect pin insertion or over-tightening.
Troubleshoot Common Problems
Tools Spin Without Grabbing Pins
The cause is worn or undersized tool tips that fail to seat in the pin recesses. Request free replacement tools from Garmin support. Avoid forcing the tool because this can round off the pin ends.
Pins Won’t Turn or Feel Stuck
The cause is trying to push instead of rotate, or rotating both pins the same way. Watch the official Garmin video. Remember, opposite rotation only. Try a slight wiggle to break initial resistance.
Band Feels Loose After Installation
The cause is pins not fully tightened or inserted incorrectly. Reinsert and re-rotate until firm. Confirm the pin goes outside to inside, not the reverse.
Stripped or Damaged Pins
The cause is use of pliers, excessive force, or defective tools. Stop immediately. Contact Garmin for replacement pins and tools. Do not reuse damaged hardware.
Watch the Official Video First
Garmin’s YouTube Guide Is Critical
Before starting, watch Garmin’s official tutorial called How to Change Your Garmin Lily Band. This one-minute video shows the correct wrench tool placement, how to rotate pins in opposite directions, and the smooth removal and installation process.
Watch the video twice, once before and once during setup. It prevents nearly all common errors.
Follow Best Practices
Do This
Watch the official video multiple times. Use only Garmin-supplied or replacement tools. Rotate pins in opposite directions. Reuse original pins unless damaged. Work slowly and patiently.
Don’t Do This
Never use pliers, tweezers, or screwdrivers. Never push pins straight out. Never discard old pins. Never over-tighten the locking mechanism. Never rush the process.
Get Support If Needed
Contact Garmin for Help
If you’re stuck, go to the Garmin support website and search for Lily band replacement. Use live chat or email support. Garmin’s team can email replacement tools, provide troubleshooting tips, and ship new pins if damaged.
One real user reported that they emailed Garmin, got new tools in three days, and swapped their band in just two minutes.
Key Takeaways for Changing Your Garmin Lily Band
The Garmin Lily uses twist-lock pins, not spring bars. You must rotate pins in opposite directions to unlock them. Always reuse the original pins instead of discarding them. Never use pliers because they risk permanent damage. Request free tools from Garmin if yours slip. Watch the official video before starting. Work slowly and align the band properly.
With the right knowledge and tools, changing your Garmin Lily watch band is simple and safe. Master the twist-lock system once, and you’ll be able to switch bands confidently for years. Whether you’re upgrading for comfort, style, or function, this small change makes a big difference in your wearable experience.
Frequently Asked Questions About Changing Garmin Lily Watch Bands
Can I use any watch band with my Garmin Lily?
No, you must use bands specifically designed for the Garmin Lily. The unique twist-lock pin system means standard watch bands won’t fit properly. Garmin offers official replacement bands in silicone, leather, metal mesh, and other materials.
How long does it take to change the band?
Once you understand the technique, band changes take under five minutes. The first time may take longer as you learn the twist-lock system. Watching the official video beforehand significantly speeds up the process.
What if I lose the pins during replacement?
The pins are reusable, so place them in a small container immediately after removal. If you lose them, contact Garmin for replacement pins. Do not attempt to use the band without the proper pins because it won’t secure properly.
Why do my tools keep slipping?
The tools included with some replacement kits may be poorly machined. This is a known issue. Contact Garmin for free replacement tools rather than forcing the tools, which can damage the pins.
Is the band change covered under warranty?
Manufacturing defects in the band may be covered, but damage caused by user error during band replacement is not covered. Defective tools may be replaced under warranty or via goodwill support from Garmin.


