Your Apple Watch becomes part of your daily life, so it makes sense you want to switch bands for different occasions, activities, or simply to refresh your look. Whether you’re swapping a Sport Band for a Milanese Loop before a meeting or replacing a worn silicone band after months of gym sessions, the process takes under 30 seconds once you know what you’re doing. This guide covers every step from locating the release mechanism to verifying a secure fit, plus compatibility rules and maintenance tips to keep your watch performing its best.
Locate the Quick-Release Mechanism on Your Apple Watch
Before removing your current band, you need to find the built-in release system that makes tool-free changes possible.
Find the Release Buttons
Turn your Apple Watch over and look at the back case. You’ll see two oval-shaped cutouts, one on each side of the watch body. Inside each cutout sits a spring-loaded pin that releases the band when pressed. This design is identical across all Apple Watch models, from the original Series 1 to the latest Ultra 2, so the process never changes regardless of which watch you own.
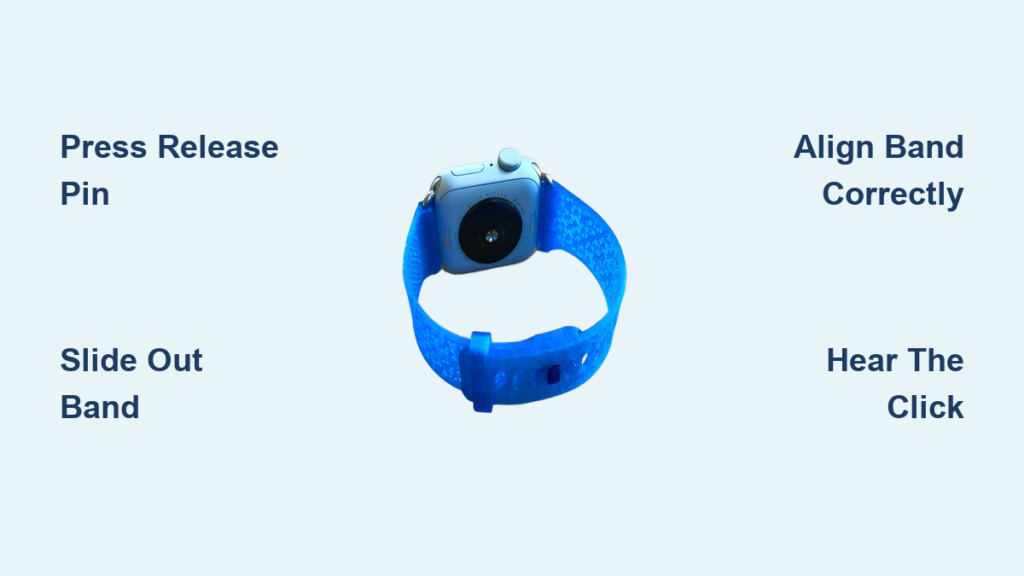
Press the Release Pin Correctly
Use your fingertip or fingernail to press firmly into the oval cutout. Apply steady, consistent pressure. Some resistance is normal, especially if the band hasn’t been removed in a while. Avoid using paperclips, tweezers, or other sharp tools, as they can scratch or damage the pin mechanism. The goal is to depress the pin fully so the band can slide out smoothly.
Remove Your Current Apple Watch Band
With the release mechanism engaged, removing the band takes only a few seconds.
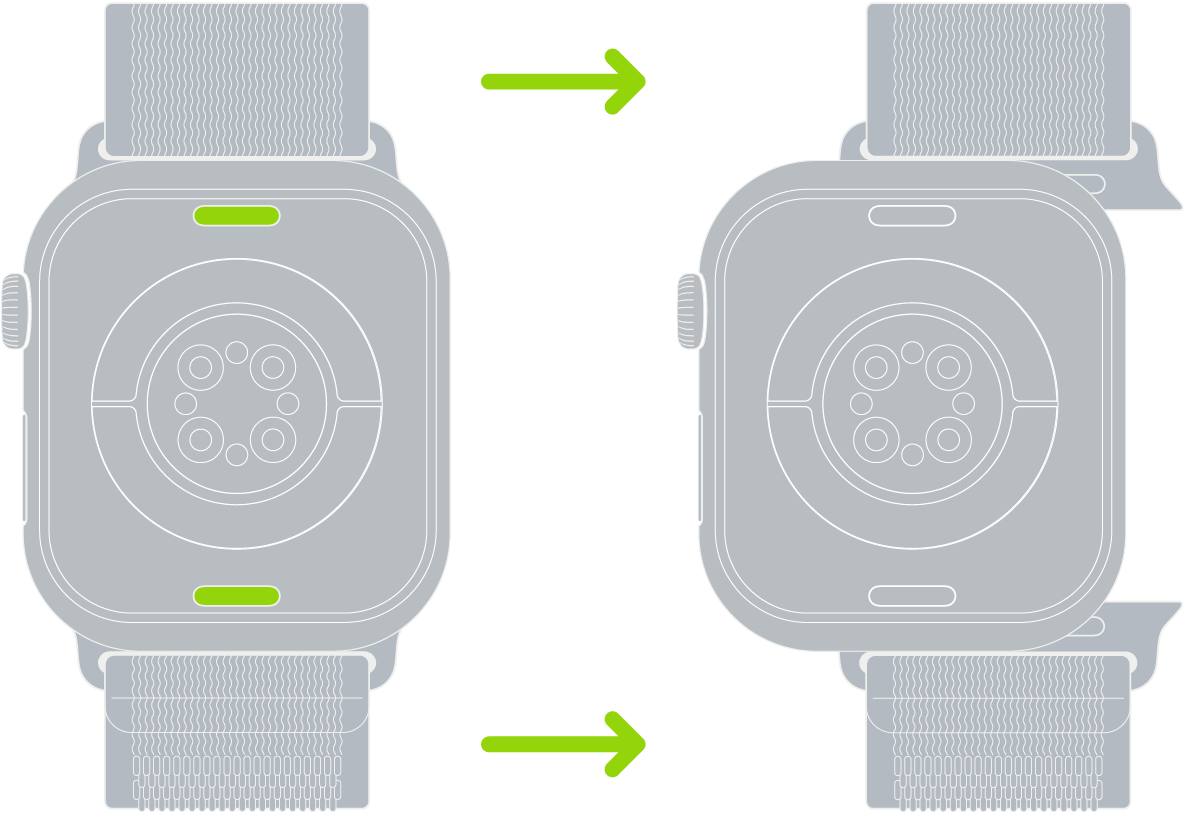
Slide the Band Out Horizontally
While pressing the release pin, slide the band straight outward from the case. Keep the motion horizontal. Do not pull upward or twist, as this can damage the connector. If the band doesn’t move, press the pin deeper and try wiggling slightly to overcome any resistance from debris or wear.
Detach Both Sides and Clean the Slots
Release one side first, then repeat on the opposite side. After both sides are free, lift the band away from the watch. Inspect the connector slots for lint, sweat residue, or debris. Use a dry microfiber cloth or compressed air to clean the area. Avoid liquids or alcohol-based cleaners, which can damage internal components.
Attach a New Apple Watch Band Securely
Installing a new band is straightforward when you follow the correct orientation and insertion steps.
Align the Band Properly
Hold your new band with the text, logo, or textured side facing outward, away from the watch case. The smooth or flat side should rest against the watch body. This orientation ensures the connector pins slide in correctly and lock securely. Installing a band upside down is the most common mistake. It may partially insert but will not click into place.
Push Until You Hear the Click
Insert one end of the band into the slot and push straight in until you hear a distinct click. This sound confirms the internal latch has engaged. Repeat on the other side. You do not need to press the release button during installation. The spring mechanism automatically locks when the band is fully seated.
Stop if You Feel Resistance
If you meet resistance during insertion, stop immediately. Forcing a misaligned band can damage the connector or scratch the case. Remove the band, check the orientation, and try again. Proper alignment means the band slides in smoothly with firm, even pressure.
Verify the Band Is Properly Connected
A loose band can fall off during daily wear, so always confirm a secure fit before walking away.
Perform the Pull Test
Gently tug on both ends of the band after installation. There should be no movement, wobble, or disengagement. If the band shifts or feels loose, remove it and reinstall until you hear a solid click on both sides.
Check for Gaps or Tilt
Visually inspect both sides of the watch. The band should sit flush against the case and run parallel to the watch face. Any visible gap or tilt indicates improper insertion. Correct this before wearing the watch.
Test During Normal Movement
Wear the watch for a few minutes and move your wrist through different motions. Raise your arm, rotate your wrist, and mimic workout movements. If the watch stays stable and the band doesn’t loosen, the installation is successful.
Choose the Correct Band Size for Your Watch
Not all bands fit all watches. Size compatibility is critical for a secure fit.
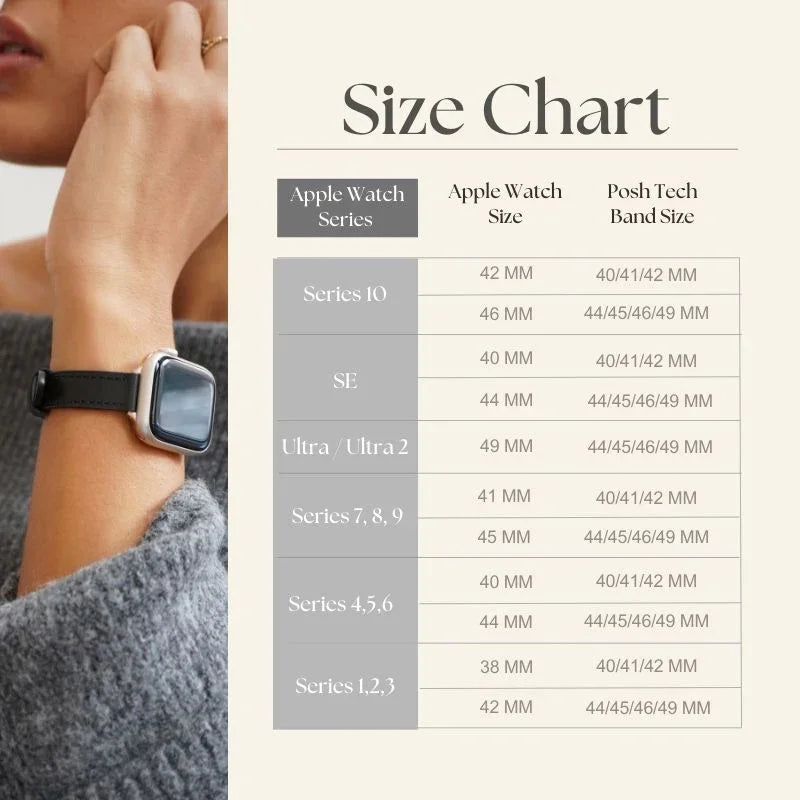
Match Your Watch to the Right Band Group
Apple Watch bands fall into two size families. The 38/40/41mm group fits 38mm, 40mm, and 41mm watches. The 42/44/45/49mm group fits 42mm, 44mm, 45mm, and 49mm watches, including Apple Watch Ultra. A 40mm Sport Band works on a 41mm Series 7, but a 42mm band will not fit a 40mm case. Check the case size engraved on the back of your watch before buying.
Verify Third-Party Band Compatibility
Many third-party bands work well, but only if they use Apple-certified connectors. Look for “Made for Apple Watch” labeling when shopping. Cheap knockoffs may fit loosely or damage the release pins over time.
Select the Right Band Type for Your Activity
Your band choice should match what you’re doing, not just your style preferences.
Bands for Exercise and Running
Choose Sport Band or Sport Loop for gym sessions and running. Both are sweat-resistant, breathable, and stay secure during high-motion activities. The Sport Loop’s fabric weave offers superior grip and ventilation.
Bands for Work and Formal Events
Opt for Milanese Loop, Leather Link, or Stainless Steel Link for office wear. These offer a polished, professional look. The Milanese Loop’s magnetic closure is sleek and easily adjustable.
Bands for Swimming and Water Activities
Only use fluoroelastomer Sport Band or Ocean Band in water. These are fully water-resistant and safe in saltwater. Avoid leather or fabric bands, which degrade when wet.
Bands for Sleep Tracking
Solo Loop or Braided Solo Loop work well for overnight wear. They’re soft, seamless, and stay in place without irritating your skin.
Avoid These Common Band-Changing Mistakes
Even simple tasks can go wrong. Here’s how to prevent the most frequent errors.
Band Won’t Slide Out
Cause: Not pressing the release pin far enough. Fix: Apply firmer, steady pressure using your fingernail for better grip. Clean the slot if debris is blocking the pin.
No Click During Installation
Cause: Band is upside down. Fix: Flip the band so the logo or text faces outward. Reinsert with firm, straight motion.
Loose or Wobbly Connection
Cause: Incomplete insertion or dirty slot. Fix: Remove the band, clean both the slot and connector, then reinstall until you hear a solid click.
Stiff Release Buttons
Cause: Dust, sweat, or infrequent use. Fix: Clean regularly with compressed air or a dry cloth. Work the mechanism gently a few times to restore smoothness.
Keep Your Bands and Connectors in Top Condition
Regular care extends the life of your bands and keeps the release mechanism working smoothly.
Clean Bands After Heavy Use
Rinse silicone bands with lukewarm water and mild soap, then air dry. Hand wash fabric bands with gentle detergent, never machine wash. Wipe metal bands with a dry or slightly damp cloth. Use only a dry cloth on leather bands and keep them away from moisture.
Store Bands Properly
Keep bands flat or loosely coiled in a drawer or case. Avoid twisting or bending, especially metal bands. Rotate between multiple bands to reduce wear on any single one.
Frequently Asked Questions About Changing Apple Watch Bands
Do I need tools to change my Apple Watch band?
No tools are required. Apple Watch bands use a built-in quick-release system that works with just your fingers. Simply press the release buttons and slide the band out.
Can I change my Apple Watch band while the watch is on?
Yes, you can change the band with the watch powered on or off. Powering off is optional but recommended, especially when handling metal or magnetic bands, to prevent accidental screen activation.
Will changing my Apple Watch band void the warranty?
No. Band changes are considered a normal user activity and do not affect your warranty. However, damage caused by improper technique, such as using tools to pry bands or forcing misaligned bands, may not be covered.
How do I know if a third-party band will fit my watch?
Check that the band specifies compatibility with your watch case size (38/40/41mm or 42/44/45/49mm). Look for “Made for Apple Watch” certification to ensure proper fit and connector quality.
Why won’t my new band click into place?
The most common cause is installing the band upside down. Check that the logo or text faces outward. If orientation is correct, the slot may contain debris. Clean it and try again.
How often should I clean my Apple Watch band connectors?
Clean the connectors every time you change bands, or more frequently if you sweat heavily or use your watch in dusty environments. Regular cleaning prevents sticking and ensures smooth release mechanism operation.
Key Takeaways for Changing Your Apple Watch Band
The Apple Watch band system is designed for quick, tool-free changes using a simple press-slide-click method. Always verify size compatibility before buying new bands, and check that third-party options have Apple-certified connectors. Clean the connector slots regularly to prevent sticking and maintain smooth operation. When installing a new band, ensure correct orientation with the logo facing outward, push until you hear a distinct click, and perform a pull test to confirm secure attachment. With proper technique and care, you can swap bands hundreds of times without any risk to your watch or warranty.


