Have you ever looked at your Baby-G watch and realized the time is off? Whether you’ve traveled across time zones, replaced the battery, or just noticed the time drifting, knowing how to change time on a Baby-G watch is essential for keeping your Casio timepiece accurate. The process takes less than a minute once you understand the button layout. This guide covers the universal method that works across nearly all digital and analog-digital Baby-G models, plus troubleshooting tips for common issues.
Enter Time-Setting Mode on Your Baby-G
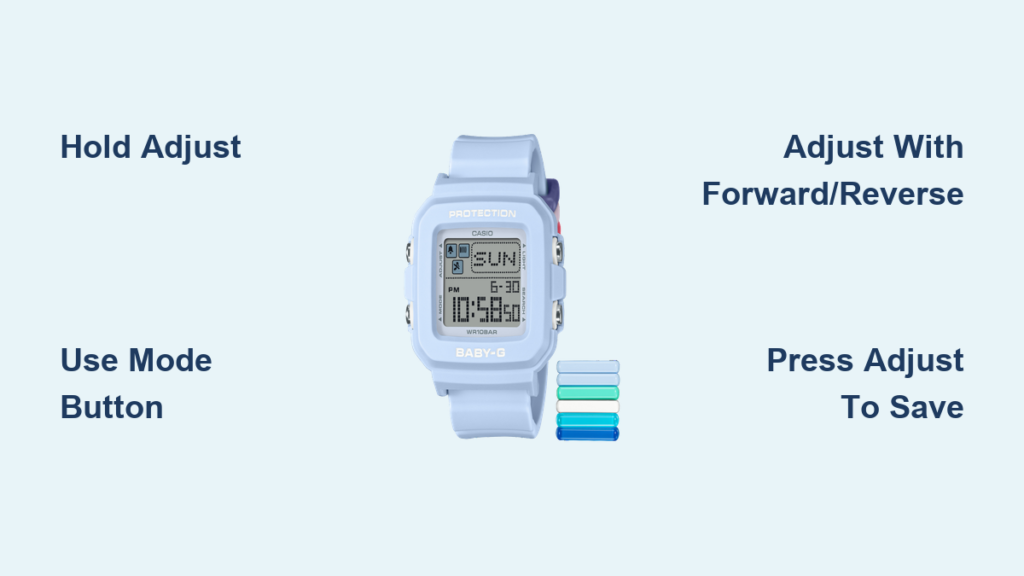
Press and hold the upper-left button labeled Adjust for approximately 3 to 5 seconds. Keep holding until you see one of the digits on the digital display start flashing. This flashing indicates the watch has entered time-setting mode and is ready for adjustments.
Watch for the Flashing Digit
When seconds flash on your display, you have successfully entered edit mode. If nothing happens after holding Adjust, ensure your battery isn’t dead and try holding the button for a full 5 seconds instead of 3. Avoid pressing any other buttons during this step, as Adjust is your gateway into configuration mode.
Navigate Through Time Settings

Once in edit mode, use the lower-left button labeled Mode to cycle through adjustable fields. Each press moves you to the next component in this sequence:
• Seconds (flashes first)
• Minutes
• Hours
• Date (day, month, year)
• 12/24-hour format or alarm settings
The currently selected field will flash, showing you exactly what you can adjust. Press Mode slowly and deliberately to avoid skipping past the field you need.
Count Your Mode Button Presses
Remember this simple sequence: seconds is the first press, minutes is the second, and hours is the third. This counting method helps you avoid confusion, especially on models with extra functions. If you accidentally press too many times, simply continue cycling until you return to seconds.
Adjust the Time Values
With your desired field flashing, use the right-side buttons to set the correct value. The upper-right button increases numbers, while the lower-right button decreases them.
Increase Values with Forward
Press the upper-right button labeled Forward or Search to increase the selected value by 1 with each press. Hold it down to scroll quickly through higher numbers. This button serves the same increment function regardless of what label your specific model uses.
Decrease Values with Reverse
Press the lower-right button labeled Reverse to decrease the number by 1. This button also activates the backlight during normal use, so press and hold it slightly longer when adjusting values to prevent accidentally turning on the light. Hold it down to cycle backward rapidly through values.
Example Adjustment Process
If minutes are flashing at “45” and you need “12,” you have two options. Press Reverse 33 times to reach 12 directly, or press Forward to cycle forward through 45, 46, 47, and so on until you loop around past 59 to 00 and continue to 12.
Set Seconds for Precision Timing
For the most accurate setting, adjust the seconds field so it reads 00 just as your reference clock hits the top of the minute. This synchronization method ensures your Baby-G stays perfectly aligned with atomic time.
Precision Sync Method
Set your minutes and hours first, then return to the seconds field using the Mode button. Wait until your phone or reference clock shows 58 or 59 seconds. Press Forward once to set seconds to 00 at the exact moment the new minute begins, then immediately press Adjust to confirm. This technique eliminates any guesswork and keeps your watch accurate within seconds.
Handle AM/PM Settings
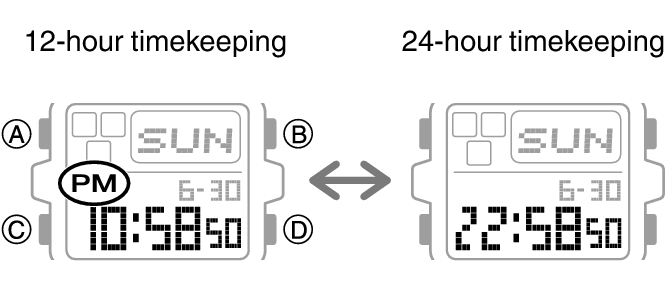
If your watch uses 12-hour format, there is no direct AM/PM toggle. Instead, cycle through 12-hour increments to switch between morning and afternoon times.
Cycle Through 12-Hour Format
While hours are flashing, press Forward or Reverse. The hour will cycle from 11 to 12 to 1 and continue through the sequence. Continue pressing until the correct AM or PM indicator appears. For example, if it shows “3 PM” but should be “3 AM,” press Reverse 12 times to shift back by 12 hours.
Confirm and Save Your Settings
Once all time and date fields are correct, press the Adjust button again. This stops the flashing and returns the watch to normal timekeeping mode. Do not exit by pressing Mode repeatedly, as this may skip confirmation and leave your settings unchanged.
Analog-Digital Model Behavior
On analog-digital models like the BA-110, the hour and minute hands will automatically move to match the digital time after you confirm. This may take 5 to 10 seconds. The second hand often resets to the 12 o’clock position during this sync process. Do not manually move the hands, as this can damage the internal mechanism.
Troubleshoot Common Baby-G Time-Setting Issues
Several frequent problems can occur when changing time on your Baby-G. Here are solutions for the most common issues.
Cannot Enter Time-Setting Mode
If holding Adjust does nothing, try holding it for 5 seconds instead of 3. Check that your battery has charge by looking for a dim display. If buttons feel sticky or worn, clean the contacts gently with a soft cloth. On older models, button response may be sluggish, so press firmly and steadily.
Minutes Jump to Odd Values
If adjusting minutes causes the display to jump between fixed values like 31, 46, 01, and 16, you are likely in alarm or countdown timer mode rather than time-setting mode. Exit and restart by pressing Adjust, then hold Adjust again for 3 or more seconds. Press Mode slowly until minutes flash without any prefix like “ALM” or “TMR.” This issue commonly occurs on module 5556 watches.
Analog Hands Fail to Move
After setting the digital time, wait 15 seconds for some models to complete hand synchronization. If hands still do not move, try resetting the time again from scratch. If the problem persists, your battery may be too weak to power the hand motor, and professional service may be needed.
Backlight Turns On Instead of Decreasing Value
If pressing Reverse activates the backlight instead of lowering the value, you are not holding the button long enough. Press and hold Reverse for a full second when adjusting values. Ensure the correct field is flashing before pressing, and practice in a well-lit area to avoid accidental backlight activation.
Model-Specific Tips for Popular Baby-G Watches
Casio BG169R-2B
This model uses the standard four-button layout. The backlight features an afterglow function and activates with the Reverse button. When adjusting time, avoid quick taps on Reverse to prevent accidentally turning on the light. Use Forward for faster minute changes to minimize button confusion.
Baby-G BA-110 Series (Analog-Digital)
These models feature both analog hands and a digital display. The time-setting process is identical to digital models, but you must press Mode extra times to skip past alarm settings. Confirm you are in time mode and not alarm mode before making adjustments. The second hand moves in small jumps during synchronization, which is completely normal.
Keep Your Baby-G Accurate Long-Term
Use Auto-Sync Features If Available
Some newer Baby-G models support Casio Connected via Bluetooth or Wave Ceptor for radio sync. If your model includes these features, pair it with the Casio Watches app and enable automatic time calibration. Your watch will update itself using your phone or atomic signals, requiring no manual adjustment.
Battery Maintenance
Battery life ranges from 2 to 7 years depending on your model and backlight usage. A dying battery can cause time resets or failed mode entry. Replace with a CR1616 or CR1620 (common Baby-G batteries) at a jeweler or authorized service center. Do not open the case yourself, as this breaks water resistance and voids your warranty.
Final Checklist Before You Finish
Before concluding, verify these steps:
• Held Adjust until seconds flashed
• Used Mode to select minutes and hours correctly
• Adjusted values with Forward and Reverse buttons
• Set seconds to 00 at the top of a minute for precision
• Pressed Adjust to save and exit
• Waited for hands to auto-sync on analog-digital models
If you checked all these items, you have successfully changed the time on your Baby-G watch.
When to Seek Professional Help
Visit a Casio-authorized service center if your buttons do not respond despite full presses, your display shows faded or missing segments, analog hands consistently misalign after multiple reset attempts, or your watch loses more than 1 minute per day. Casio offers 1 to 3 years of warranty coverage, but damage from drops, water beyond the rated limit, or DIY repairs is not covered.
Frequently Asked Questions About Changing Time on a Baby-G Watch
How do I enter time-setting mode on my Baby-G?
Press and hold the Adjust button (upper-left) for 3 to 5 seconds until you see digits flashing on the display. The seconds field typically flashes first, indicating edit mode is active.
Why do minutes jump between odd numbers when I try to adjust them?
You are likely in alarm or countdown timer mode instead of time-setting mode. Press Adjust to exit, then hold Adjust again and press Mode slowly until the minutes field flashes without any prefix like “ALM” or “TMR.”
How do I fix AM/PM on my 12-hour Baby-G watch?
There is no direct AM/PM toggle. While hours are flashing, press Forward or Reverse to cycle through 12-hour increments until the correct AM or PM indicator appears.
Why won’t the analog hands move after I set the digital time?
Wait 10 to 15 seconds, as some models delay hand movement. If hands still do not move, try resetting the time again. A weak battery may also be unable to power the hand motor.
Can I change time on my Baby-G without the manual?
Yes, the process is universal across nearly all Baby-G models. The four-button system (Adjust, Mode, Forward, Reverse) works the same way on digital and analog-digital variants.
Key Takeaways for Setting Your Baby-G Watch Time
The process of changing time on a Baby-G watch follows a consistent four-button method across nearly all models. Hold Adjust to enter time-setting mode, use Mode to navigate between seconds, minutes, hours, and date, adjust values with Forward and Reverse, then press Adjust again to save. For analog-digital models, the hands will automatically synchronize with your digital time settings. Remember to hold buttons for a full second to avoid triggering backlight or other secondary functions. If you encounter persistent issues like jumping minute values or failed hand synchronization, try resetting from scratch or consult a Casio service professional. With this knowledge, you can keep your Baby-G perfectly accurate whether you’ve traveled across time zones or simply need to restore accuracy after a battery change.


