Is your Garmin watch failing to sync workouts or download updates without your phone nearby? Connecting your watch to Wi-Fi unlocks powerful standalone features like automatic data uploads, music downloads, and over-the-air software updates. Whether you own a Forerunner 965, vivoactive 6, Venu 2 Plus, or another Wi-Fi-enabled model, this guide walks you through three reliable methods to get connected.
Why Connect Your Garmin Watch to Wi-Fi
Wi-Fi connectivity transforms your Garmin watch into a truly independent fitness companion. Once linked, your watch can upload activity data to Garmin Connect without needing your phone nearby, download playlists from Spotify or Amazon Music, and install firmware updates automatically. This proves especially valuable for runners and travelers who prefer leaving their smartphone behind during workouts.
Key Benefits
• Sync data without your phone: Upload workouts even when your phone is off or out of range.
• Download music directly: Streamline your runs with offline playlists from supported services.
• Install updates over the air: Get new features and security fixes without a computer connection.
• Reduce phone dependency: Use your watch more autonomously in daily life and travel.
Check Wi-Fi Compatibility First

Not all Garmin watches support Wi-Fi, and setup methods vary by model. Before proceeding, confirm your device is Wi-Fi-capable.
Supported Models
• Forerunner 965
• vivoactive 6
• Venu 2 Plus
• fēnix 7 series
• epix Gen 2
• MARQ series
⚠️ Entry-level models like Forerunner 55 or Instinct 2 do NOT have Wi-Fi capabilities.
Network Requirements
• 2.4 GHz band only: Garmin watches do NOT support 5 GHz networks.
• Security protocols: WPA2-Personal (recommended) or WPA3 on newer firmware.
• No WEP or static IP: These configurations are unsupported.
• Router must broadcast SSID: Hidden networks won’t appear during scanning.
Method 1: Connect Directly on the Watch
This approach works best on high-end models with full menu navigation and input capabilities.
Supported Devices
• Forerunner 965
• vivoactive 6
• fēnix 7
• epix Gen 2
Step-by-Step Setup
- Press and hold the top button to access the main menu.
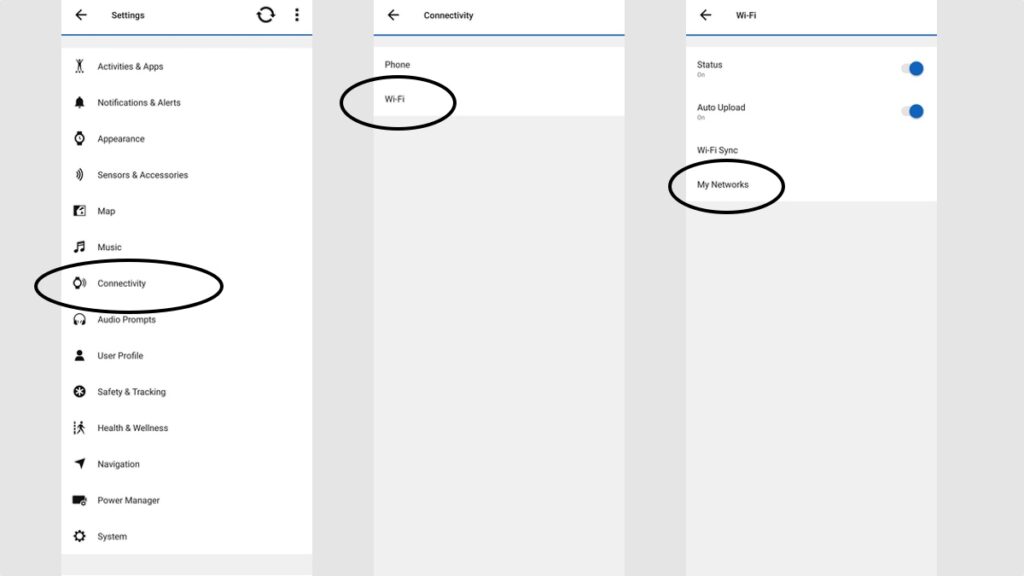
- Navigate to Settings, then select Connectivity.
- Choose Wi-Fi, then tap My Networks.
- Select Search for Networks and wait for scanning to complete.
- Choose your Wi-Fi network from the list.
- If prompted for a password, the Garmin Connect app launches automatically on your paired phone.
- Use your phone’s keyboard to enter the password securely.
- Tap the checkmark to confirm.
- Look for “Connection Successful” on the display.
✅ The watch automatically reconnects whenever in range of this network.
Method 2: Use the Garmin Connect App
This method offers the most user-friendly experience and works across all Wi-Fi-enabled Garmin watches.
Required Conditions
• Phone paired via Bluetooth to your watch
• Garmin Connect app updated (iOS 13+ or Android 8.0+)
• Active internet connection on your phone
How to Connect via App
- Open Garmin Connect on your smartphone.
- Tap More (bottom right), then select Garmin Devices.
- Choose your watch from the device list.
- Navigate to Connectivity, then Wi-Fi (or General, then Wi-Fi Networks on Venu 2 Plus).
- Tap My Networks, then select Add a Network.
- Allow the watch to scan for available networks.
- Select your Wi-Fi network from the results.
- Enter the password using your phone’s keyboard.
- Tap Add, then Connect.
- Wait for the “Successfully Connected” confirmation.
📱 The app provides real-time feedback during scanning and authentication, making troubleshooting easier if issues arise.
Method 3: Connect Using Garmin Express (Desktop)
Use this method if mobile setup fails or you prefer managing settings on a computer.
System Requirements
• Windows 10+ or macOS 11 (Big Sur)+
• Latest version of Garmin Express installed
• USB charging cable for physical connection
Desktop Setup Steps
- Connect your Garmin watch to the computer using the USB cable.
- Launch Garmin Express on your desktop.
- Wait for the device to appear, then click on your device name.
- Go to Tools & Content, then Utilities, then select Find Networks.
- The watch scans for nearby networks; select yours from the list.
- Enter the Wi-Fi password in the provided field.
- Click Add or Connect.
- Garmin Express confirms successful connection.
💻 This approach offers easier password entry and stable connectivity during initial setup.
⚠️ Not all models support Wi-Fi setup via Garmin Express—consult your owner’s manual for compatibility.
Fix Common Wi-Fi Connection Problems
No Networks Detected
• Ensure your router broadcasts on 2.4 GHz (not 5 GHz).
• Move closer to the router during setup (within 30 feet).
• Restart both the watch and the router.
• Confirm the SSID is not hidden.
Password Rejected
• Retype the password manually rather than copying from password managers.
• Verify capitalization and special characters are correct.
• Temporarily disable MAC filtering on your router.
Connection Drops Frequently
• Change Wi-Fi channel to 1, 6, or 11 to reduce interference.
• Avoid placing the router near microwaves or cordless phones.
• Consider using a Wi-Fi extender if signal strength is weak.
App Keyboard Does Not Appear
• Ensure Bluetooth is enabled and the watch is paired.
• Force-close and reopen the Garmin Connect app.
• Update the app to the latest version.
Watch Won’t Reconnect Automatically
• Delete the network and re-add it fresh.
• Perform a soft reset: Hold the power button and select Restart.
• Confirm Auto-Join is enabled in your settings.
Maintain Wi-Fi Performance Over Time
Once connected, follow these practices to keep your setup running smoothly.
Manage Saved Networks
• On watch: Settings → Connectivity → Wi-Fi → My Networks
• In app: Garmin Devices → [Your Device] → Wi-Fi → Saved Networks
Remove networks you no longer use to prevent failed auto-connect attempts.
Update Firmware Over Wi-Fi
- Go to Settings → System → Software Update.
- If connected to Wi-Fi, the watch checks for updates automatically.
- Install when prompted (battery above 50% recommended).
🔔 Regular updates improve stability and add new features.
Save Battery with Smart Wi-Fi Use
• Wi-Fi scanning drains power quickly. Avoid frequent manual network searches.
• Disable Wi-Fi manually if not needed on supported models.
• Use airplane mode during workouts unless syncing live data.
🔋 Pro Tip: Charge your watch overnight while connected to Wi-Fi for seamless updates and data syncing.
Frequently Asked Questions About Connecting Garmin Watch to Wi-Fi
Why won’t my Garmin watch detect any Wi-Fi networks?
Your watch only supports 2.4 GHz networks, not 5 GHz. Check that your router broadcasts on the 2.4 GHz band and that the network SSID is not hidden. Move closer to the router during setup and restart both devices if needed.
Can I connect my Garmin watch to a 5 GHz Wi-Fi network?
No. All Garmin watches with Wi-Fi capability support only the 2.4 GHz frequency band. Attempting to connect to 5 GHz networks will result in failure.
Do I need the Garmin Connect app to enter my Wi-Fi password?
On most models, yes. Watches without native keyboards (like Forerunner 965) automatically launch the Garmin Connect app as a virtual keyboard when password entry is required. The app method works universally across all Wi-Fi-capable models.
How do I disconnect my Garmin watch from Wi-Fi?
You cannot fully disable Wi-Fi on most models, but you can remove saved networks. On the watch, go to Settings → Connectivity → Wi-Fi → My Networks, then select the network and choose Delete or Forget.
Why does my watch keep disconnecting from Wi-Fi?
Frequent disconnections typically stem from weak signal strength, router interference, or channel congestion. Move closer to the router, change the Wi-Fi channel to 1, 6, or 11, and keep the watch away from devices that cause interference like microwaves.
Will connecting to Wi-Fi drain my watch battery quickly?
Wi-Fi does consume additional power, but not excessively during normal use. The biggest battery drain occurs during active scanning or frequent manual network searches. Enable Wi-Fi only when needed and consider disabling it during workouts to extend battery life.
Key Takeaways for Connecting Your Garmin Watch to Wi-Fi
Connecting your Garmin watch to Wi-Fi unlocks standalone functionality that reduces dependence on your smartphone. The process involves three primary methods: direct setup on the watch, using the Garmin Connect app, or connecting via Garmin Express on desktop. Always ensure your network operates on the 2.4 GHz band and uses WPA2 security for compatibility.
The Garmin Connect app method proves most user-friendly for password entry and works across all supported models. After connection, your watch can automatically sync data, download music, and receive firmware updates without manual intervention. Maintain performance by keeping software updated, managing saved networks, and monitoring battery usage during extended Wi-Fi activity.
With your Garmin now connected to Wi-Fi, enjoy the freedom of uploading workouts, streaming music, and receiving updates directly on your wrist, free from cables and Bluetooth limitations.


