Nothing ruins a focused run faster than a belt that climbs, bounces, or twists with every stride. If you constantly hike your running belt back into place, the problem is rarely the belt itself. The real culprits are usually incorrect placement, poor fit, uneven weight distribution, or slick fabric contact. The fix is simpler than you think when you understand the mechanics behind belt migration.
This guide covers the exact placement, tightening, and gear-loading strategies that stop a running belt from riding up for good. You will learn how to anchor your belt at the body’s natural shelf, balance your load, and pick features that lock everything in place.
Find the Natural Waist Sweet Spot
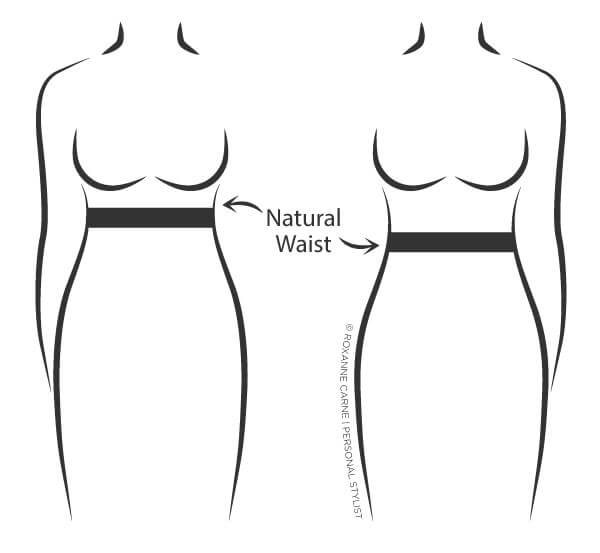
Wear It at the Narrowest Part of Your Torso
The single most effective fix for a riding-up belt is wearing it at your natural waist, the narrowest part of your torso, usually just above the hip bones. This area acts like a built-in shelf that prevents vertical movement. Many runners place belts too low on the hips, where powerful muscles expand and contract with every stride. This motion creates upward friction, pushing the belt toward the narrowest point anyway, only unevenly, causing bunching and ride-up.
For hydration belts or any belt carrying weight, this rule is non-negotiable. The natural waist stabilizes the load and keeps it out of the way of leg movement.
Avoid Hip Placement for Heavy Loads
While light belts can sometimes work on the hips, heavier belts, especially those with water bottles, must sit at the natural waist. The added weight amplifies instability when worn low. As your legs drive forward, the belt gets caught in the motion of the glutes and thighs, creating a lever effect that pulls it upward. Anchoring it higher bypasses this biomechanical conflict entirely.
Optimize Fit with Dynamic Tightening
Snugger When Standing Still
Here is a pro trick: tighten your belt slightly more than feels comfortable while standing. When you start running, your muscles expand, your core warms up, and clothing materials stretch. This can loosen even a “perfect” static fit. If it feels ideal while still, it will likely be too loose once you are moving.
Aim for a fit that is secure but not constricting, like a firm hug. It should stay put without digging in. Once you start running, it will settle into the ideal tension.
Check for Gaps During Motion
Mid-run, do a quick body scan. If you can slide a finger under the belt easily or feel it lifting with each stride, it is too loose. If it is pinching or restricting breathing, it is too tight. Adjust in small increments. Most quality belts have micro-adjustable straps designed for this purpose.
Balance Weight Strategically

Place Heavier Items at the Back
Where you put your gear matters. Put your heaviest item, like your phone, toward the back of the belt. This acts as a counterweight, anchoring the belt against your lower back and preventing the front from creeping upward.
A smart loading strategy looks like this:
– Phone in the center back pocket
– Keys in the side pockets
– Gels distributed evenly
This balances the center of gravity and stops the belt from rotating or tilting.
Distribute Evenly to Prevent Twisting
Uneven loading is a top cause of twisting and one-sided ride-up. If your phone is on the left and nothing on the right, the belt will rotate with every stride. Symmetry is key. Use all pockets wisely. Even if one side has a lighter item, pair it with a gel or small accessory on the opposite side.
Choose the Right Belt Design

Look for Silicone Grips and Textured Linings
Not all belts are created equal. The best anti-ride-up belts have silicone strips or textured interiors that grip your clothing or skin. These create friction against slick technical fabrics, stopping slippage before it starts.
Avoid belts with smooth, slippery inner linings. They are prone to sliding, especially when you sweat.
Prioritize Stretch and Flexibility
Rigid belts bounce. Flexible ones move with you. Choose a belt made from stretchy, adaptive materials that expand and contract with your torso. This maintains constant contact and tension throughout your run.
Brands like Fitletic, Nathan, and Salomon are known for flexible, low-profile designs that flex with the body instead of fighting it.
Use Stabilizing Back Panels
Some premium belts feature wider or reinforced back panels that act like a stabilizer, preventing vertical lift and rotation. These are especially useful for hydration belts or runners who carry more gear.
Match the Belt to the Run

Hydration Belts: Waist Placement Only
If you are using a hydration belt with bottles, wear it at the natural waist with no exceptions. The weight of fluid amplifies instability. As you drink, the shifting load can cause the belt to tilt, so ensure it is snug and the bottles are secured in bungee loops.
Pro tip: Place bottles on the back or sides depending on arm swing. If they hit your elbows, reposition them.
Race Belts: Secure at the Waist
Race belts are minimal but must stay put. Never wear them on your hips. They will slide down and flap. Wear them at the natural waist, snug enough to stay vertical. Test the bib clips during training to ensure they do not snag or loosen mid-race.
Short Run Belts: Adjust for Comfort
For light loads like keys, gels, and phones, you have more flexibility. Try the natural waist first. If it feels too high, test a slightly lower position, but only if it does not ride up during a 10-minute jog. If it does, go back up.
Fix Slippage with Compression Layers

Wear a Base Layer Under the Belt
If your belt still slips, try a compression shirt or tight-fitting base layer underneath. Loose running shorts are slick and offer no grip. A compression layer provides texture and friction, helping the belt stay in place.
This is especially effective in hot weather when sweat reduces fabric grip.
Avoid Baggy Shorts with Belts
Loose shorts create a slippery surface between your skin and the belt. The belt rides up the fabric instead of staying anchored. Opt for fitted shorts with a secure liner or use a belt-specific running top.
Troubleshoot Common Issues
Belt Keeps Riding Up? Check Placement and Tightness
If your belt climbs during runs, run through this checklist:
– Move it to your natural waist
– Tighten it slightly more when standing
– Ensure no loose pockets or dangling straps
This fixes the majority of ride-up cases.
Belt Twists? Balance the Load
Twisting means uneven weight. Stop mid-run and redistribute:
– Phone in the back
– Keys and gels on both sides
– No empty pockets on one side
Belt Bounces? Reduce Weight or Upgrade Material
Bouncing usually means the belt is too loose, the material is rigid, or the load is too heavy. Solutions include tightening the fit, switching to a stretchy flexible belt, or carrying less. For heavy loads, consider a running vest instead.
Belt Slides Down? It Is Too Low or Too Smooth
If it slips past your hips, the belt is worn too low, the fabric is slick, or the elasticity is gone. Fix it by moving to the natural waist, adding a compression layer, or replacing an old stretched-out belt.
Maintain Your Belt for Long-Term Performance
Wash It Right to Preserve Elasticity
Heat destroys elastic. Always wash your belt in cold water and air dry. Never toss it in the dryer. Over time, high heat breaks down the fibers, causing the belt to loosen and lose its snap.
Follow manufacturer care labels. Most recommend hand wash or gentle cycle.
Clean Straps and Velcro Regularly
Dirt, sweat, and lint reduce grip. Clean Velcro and adjustable straps monthly. Use a soft brush to remove debris so they hold tension properly. Worn or frayed straps should be replaced.
Replace When It Loses Shape
If your belt no longer returns to its original shape after stretching, it is time for a new one. A sagging belt will never stay put, no matter how you adjust it. Most running belts last 1 to 2 years with regular use.
Frequently Asked Questions About Running Belts
Where Should a Running Belt Sit to Prevent Riding Up?
The belt should sit at the natural waist, which is the narrowest part of the torso just above the hip bones. This area acts as a natural shelf that anchors the belt and prevents it from migrating upward during movement.
Why Does My Running Belt Keep Sliding Down?
Your belt slides down because it is worn too low on the hips, the inner fabric is too slick, or the elastic has lost its stretch. Moving the belt higher to the natural waist and adding a compression layer underneath usually fixes the problem.
How Tight Should a Running Belt Be?
A running belt should feel slightly tighter than comfortable when standing still. Once you start moving, your muscles expand and the fabric stretches, so the belt will settle into the perfect tension during motion.
Do Silicone Grips on Running Belts Really Work?
Yes, silicone grips and textured interiors create friction against clothing and skin, which significantly reduces slipping. They are especially helpful when wearing slick technical fabrics or running in hot, sweaty conditions.
Can a Running Belt Cause Chafing?
A belt can cause chafing if it is too tight, has rough interior seams, or sits over an area of high friction. Loosening slightly, choosing a seamless belt, and applying anti-chafe balm to pressure points prevents irritation.
Final Takeaways for a Secure Running Belt
Learning how to keep running belt from riding up comes down to three core principles. First, always anchor the belt at your natural waist to use your body’s built-in shelf. Second, tighten slightly more than feels comfortable while standing so the fit stays snug once you start moving. Third, balance your load by placing heavier items at the back and distributing smaller items evenly across all pockets.
Your next step is simple: take your current belt on a short test run using these adjustments. If it still rides up, consider upgrading to a belt with silicone grips, stretchy materials, and a stabilizing back panel. A secure belt means a distraction-free run, better focus, and a smoother stride from start to finish.