You just got a new watch, slipped it on, and realized it is too big. But when you turn it over, there are no visible pins or arrows. Panic sets in. How do you remove links from a watch without pins? You are not alone. Many modern watches, especially models from Casio, Seiko 5, and Citizen, use non-pin link systems that look seamless and confuse even experienced wearers. The good news is these bands are adjustable, but they require a different approach than traditional pin-based removal.
This guide walks you through every step. You will learn how to identify your link type, choose the right tools, remove links correctly, and avoid common mistakes. Whether you are working on a budget Casio or a higher-end timepiece, you will learn how to adjust it like a pro without damaging the finish or losing tiny parts.
Identify Your Watch Link Type

Before touching any tool, you must determine how your watch links are connected. Mistaking a screw link for a folded one can lead to bent metal or stripped components. Take a close look at the side and inner edges of the band with a magnifying glass or bright light.
Check for Screw Connections
If you see small screw heads on the side of the links, your bracelet uses a screw-type system. These are common in higher-end or designer watches and often require a precision screwdriver. The screws are usually slotted or Phillips and may be hidden under a slight lip. Never assume these are pins. Forcing them will damage the threads.
Essential tools for this type include a precision screwdriver set with sizes ranging from 0.8mm to 1.5mm. A loose fit can strip the screw head, so match the tool exactly to the slot.
Look for Folded or Rolled Links
No screws or arrows? It might be a folded link system. These links are made from a single piece of metal folded around an internal clip or tab. They appear seamless from the outside, with smooth edges and a central seam. Common on Casio and Seiko 5 models, they open by releasing an internal spring or clip.
Run your finger along the inner edge of the link. If you feel a small gap or seam, it is likely a folded design. Some users report a small lip or tab inside the seam. This is the clip you need to release.
Spot Snap-Fit or Hidden Clasps
Some bands use internal spring tabs or fold-over joints that release when pressure is applied to a tiny hole or notch. These are often found in mid-range metal bands and require no tools. Just a pushpin or needle can depress the release. The connection may snap apart with slight resistance.
If the clasp has micro-adjustment holes, you may not need to remove links at all for minor sizing. Check the clasp first before attempting link removal.
Gather the Right Tools

Using the wrong tool is the fastest way to scratch or break your watch band. Fortunately, you do not need a full watchmaking kit. Most jobs can be done with household items or inexpensive precision tools.
Essential Tools for Non-Pin Links
The following tools will handle most non-pin link removal scenarios.
Small flathead screwdriver (1.5mm or smaller) for prying open folded links. Precision screwdriver set for screw-connected links. Pushpin, sewing needle, or SIM ejector tool for depressing snap-fit releases. Needle-nose pliers with rubber tips for gripping and reassembling links. Soft microfiber cloth or towel to protect the watch and catch small parts. Small tray or dish to store screws, links, and clips.
Avoid using pliers directly on polished surfaces. This can leave permanent marks.
Household Substitutes That Actually Work
You do not need to buy specialty tools for most adjustments. Several common household items work well for non-pin systems.
A straightened paperclip can act as a pin pusher for soft metal links. A thumbtack is ideal for pressing hidden release points. A sewing needle fits into tight gaps better than most screwdrivers. A foam pad or folded cloth provides cushioned support during work.
Never use a hammer unless you are certain of the mechanism. Most non-pin systems do not require tapping.
Prepare Your Workspace
A clean, organized setup prevents lost parts and accidental damage. One dropped screw can vanish in seconds. Taking a few minutes to prepare saves time overall.
Set Up a Safe Work Area
Choose a flat, well-lit surface. A kitchen table or desk works well. Lay down a soft cloth or microfiber towel to protect the watch and prevent small components from rolling away. Place a small dish or tray nearby to store screws, links, and tools.
Use a magnifying lamp or smartphone flashlight to spot tiny gaps and release points. Good lighting makes a significant difference when working with small components.
Mark Links for Removal
Wrap the watch around your wrist. A proper fit allows one finger to slide underneath comfortably. Identify which links to remove and mark them with non-permanent tape or a light pencil dot.
Always remove equal numbers from both sides of the clasp. This keeps the clasp centered and ensures the watch sits evenly on your wrist. Removing only from one side can cause the clasp to tilt or hang awkwardly.
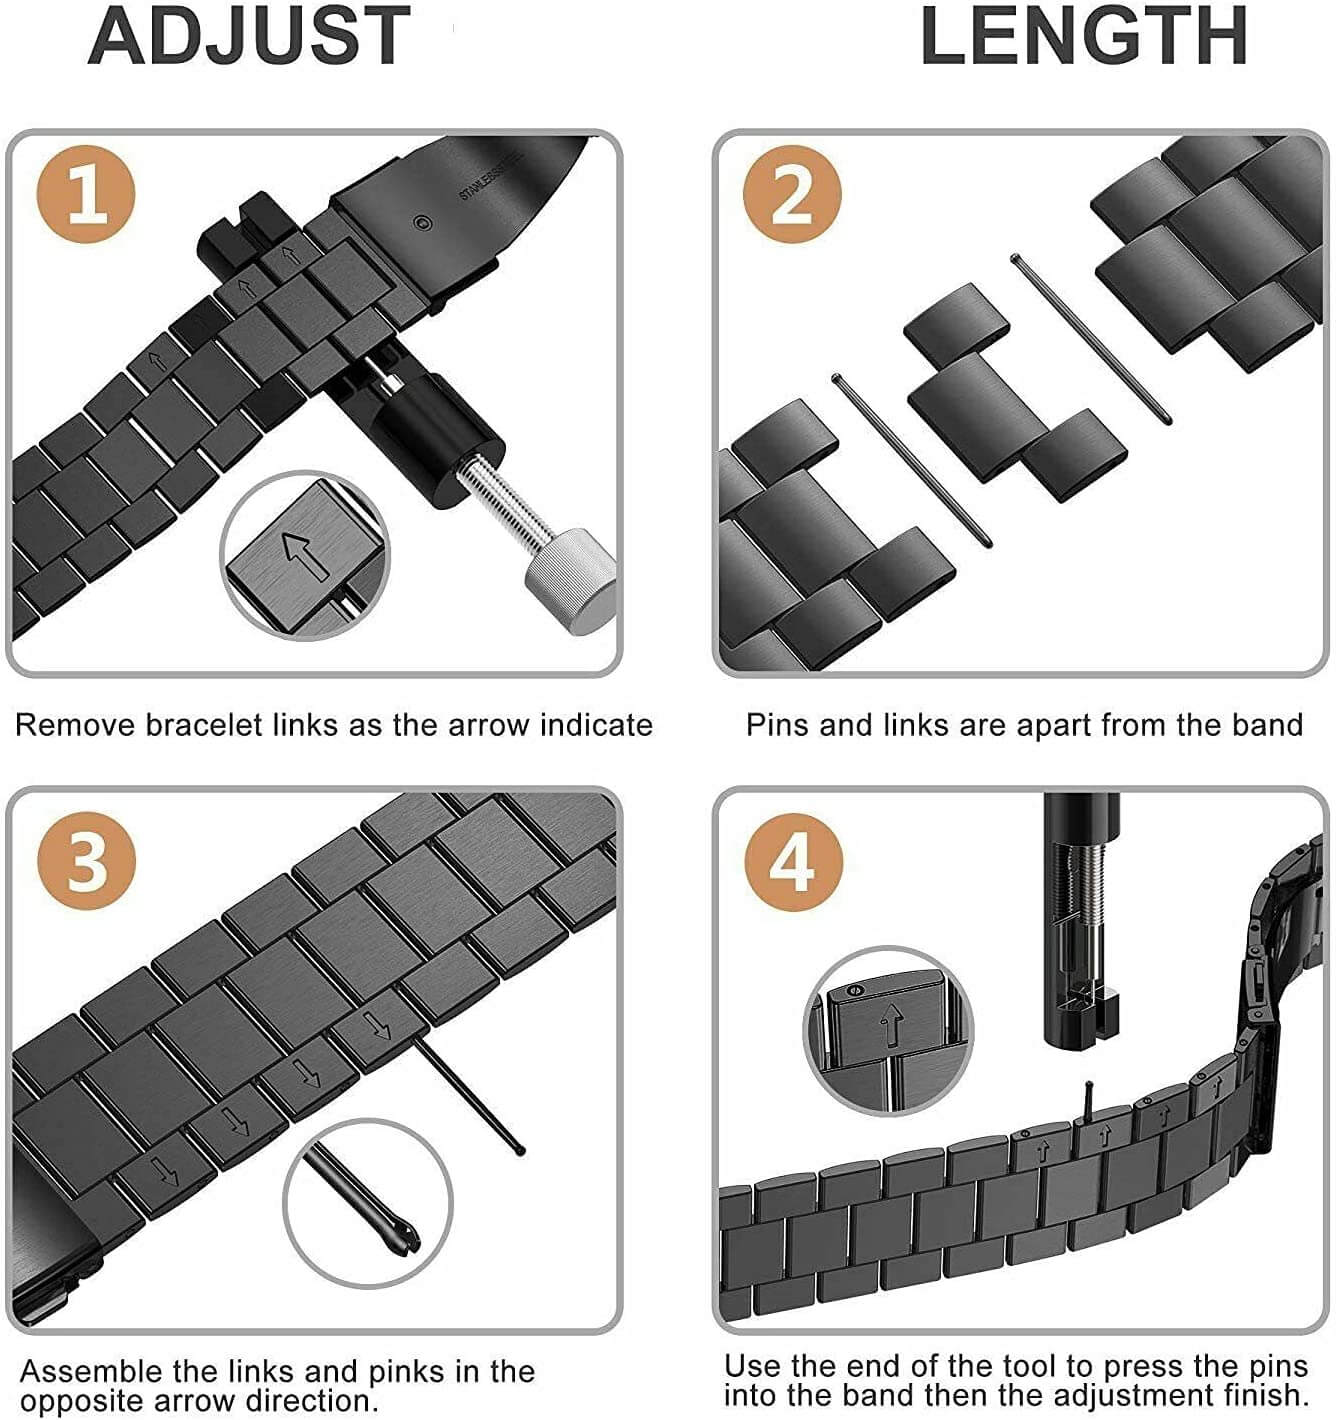
Remove Links: By Mechanism Type
Now that you have identified the link type and prepared your tools, it is time to remove the links. Follow the method below that matches your watch.
Folded Links: Open the Hidden Clip
Folded links are the most common non-pin type. They look solid but open when you release an internal clip.
Locate the Inner Seam
Turn the band over and inspect the inner side of the link. Look for a thin seam or gap running across the center. This is where the folded metal meets.
Insert a Thin Tool
Use a small flathead screwdriver, SIM tool, or sewing needle. Gently insert it into the gap. You may need to wiggle it slightly to find the release point.
Some users report a small lip or tab inside the seam. This is the clip you need to release.
Pry or Push to Release
Apply gentle upward pressure to lift the clip. You should feel it give slightly. Once released, pull the link apart by hand. It may take a few tries. Do not force it.
You push them out with a tiny flat head screwdriver in the slot on the inside of the bracelet.
Repeat for each link you need to remove.
Screw-Connected Links: Unscrew, Do Not Push
If your watch has visible screws, this is the simplest method, provided you have the right tool.
Match the Screwdriver to the Slot
Use a precision screwdriver that fits snugly. A loose fit will strip the screw head. Common sizes are 1.0mm to 1.5mm.
Turn Counterclockwise
Hold the watch steady and turn the screw counterclockwise. Remove it completely and place it in your tray. Do the same for the opposite side if needed.
Separate the Links
Once both screws are out, gently pull the links apart. They should separate easily.
Never force the link. This can bend the screw holes.
Reassemble with Care
When reconnecting, insert the screws and turn clockwise until snug. Do not overtighten. This can strip the threads or crack the link.
Apply a tiny drop of thread-locking fluid (optional) to prevent screws from loosening over time.
Snap-Fit or Fold-Over Clasps: Press and Release
These links use internal spring tabs that release when pressed.
Find the Release Point
Look for a small hole or indentation on the inner side of the link. It may be barely visible. Use a magnifier if needed.
Insert a Pushpin or Needle
Use a thumbtack, pushpin, or SIM ejector tool. Insert it into the hole and press straight down with steady pressure.
You will feel a slight click as the tab releases.
Pull the Link Apart
Once the tab is depressed, pull the link apart by hand. It should separate smoothly.
Use a pushpin or thumbtack to press down on the clasp inside the link. The clasp should release, allowing you to separate the links.
Reassemble the Band Correctly
After removing the links, reassemble the band carefully to ensure a secure fit. Rushing this step leads to loose connections and potential loss of parts.
Align the Links Properly
Hold the remaining links together and align the connection points. For folded links, make sure the inner clip is positioned correctly before pressing them together.
Press or Snap Back Into Place
For folded or snap-fit systems, press the links together evenly until they click. You may need to use your fingers or a soft tool to seat them fully.
Reinsert Screws (If Applicable)
For screw-type links, reinsert the screws and tighten gently. Double-check that they are flush with the link surface.
Over-tightening can strip the threads or crack the metal. Turn until snug, then stop.
Test the Fit and Security
Never wear the watch without testing it first. A loose link can fall off without warning, leading to loss or damage.
Try It On Your Wrist
Put the watch on and check the fit. It should be snug but not tight, allowing slight movement. One finger should fit comfortably underneath.
Perform a Tug Test
Hold the watch over a soft surface (like your towel) and give the band a light tug. If any link feels loose or separates, recheck the connection.
Always test over a soft surface to prevent damage if a link comes loose.
Troubleshoot Common Problems
Even with care, issues can arise. Here is how to fix them.
No Holes or Arrows? Check Again
If you see no pins or arrows, do not assume the band is non-adjustable. Look again for seams or folds on the inner edge. Check for screw heads on one side. Look for micro-adjustment holes in the clasp.
No arrows usually mean the bracelet uses a different system. Check for screw heads, hidden release points, pin-and-sleeve construction, or a sliding mesh clasp before you try anything else.
Pin Will Not Move? Do Not Force It
If you are trying to push a pin and it will not budge, stop. Possible causes include wrong direction (some pins only go one way), lack of support (band flexing absorbs force), or corrosion or tight fit.
For stuck pins, try a drop of lubricant (like WD-40) and wait 5 minutes. Then reapply gentle pressure.
Link Will Not Close? Recheck Alignment
If the link does not snap back together, ensure the clip or tab is not bent. Press evenly on both sides. Avoid using pliers. This can deform the metal.
The links did not go back to their original perfect fit after using pliers. This is a common user mistake to avoid.
When to See a Professional
Some watches are too valuable or delicate for DIY. Knowing when to stop prevents costly mistakes.
Stop and Seek Help If
The watch is expensive, vintage, or sentimental. The band has a polished or brushed finish (easy to scratch). The mechanism is unclear or resistant. You have bent or damaged a link.
Stop and go to a watchmaker when the bracelet is expensive, unusual, polished, ceramic, vintage, or hard to identify.
Many jewelers and authorized dealers offer free or low-cost adjustments, especially for new purchases. A quick resize bill is usually cheaper than replacing a damaged bracelet.
Maintain Your Watch After Adjustment
Proper care keeps your watch looking great after resizing.
Clean the Band
Wipe it down with a microfiber cloth to remove fingerprints, dust, or debris. Avoid water if the screws are prone to rust.
Store Spare Parts
Keep removed links and screws in a small labeled bag. You may need them for future resizing.
Inspect Regularly
Check for loose screws or wobbly links every few months. Tighten as needed.
Avoid Moisture and Impact
Keep the band dry and avoid knocking it against hard surfaces. This can loosen connections over time.
Frequently Asked Questions About Removing Watch Links Without Pins
Can I remove watch links without any tools?
Yes, for some types, especially folded or snap-fit links, you can use a paperclip, pushpin, or needle. However, precision tools reduce the risk of damage. Using proper tools is recommended for best results.
What if my watch has no arrows or holes?
It likely uses screws, folded links, or hidden clips. Inspect closely for seams, screw heads, or micro-adjustments. No arrows do not mean you should push harder. They usually mean the bracelet uses a different system.
How do I know how many links to remove?
Wrap the watch around your wrist. Remove enough so that one finger fits underneath. Remove equally from both sides for balance. This keeps the clasp centered and usually makes the watch sit better on your wrist.
Should I remove links from one side or both?
Remove from both sides. This keeps the clasp centered and improves comfort and aesthetics. Removing only from one side can cause the clasp to tilt.
How do I remove links from a Casio watch without pins?
Inspect for tiny openings or internal clips. Use a pushpin or needle to press the release point. Remove links evenly from both sides. Many Casio models use folded link systems that require a small flathead screwdriver inserted into the inner gap.
Where can I get watch links removed professionally?
Options include local jewelers, department store jewelry counters, brand-authorized service centers, and watch repair shops. Many offer free adjustments, especially for new purchases.
Key Takeaways for Removing Watch Links Without Pins
You now know how to remove links from a watch without pins. No mystery, no damage. Whether you are dealing with folded, screw, or snap-fit links, the key is patience, the right tool, and a steady hand.
The most important steps are identifying your link type first, using the correct technique for that specific mechanism, and working slowly without forcing anything. Always remove equal numbers of links from both sides to keep the clasp centered.
If in doubt, a professional resize is often free and takes minutes. With this guide, you have saved time, money, and the confidence to adjust your watch like a pro.