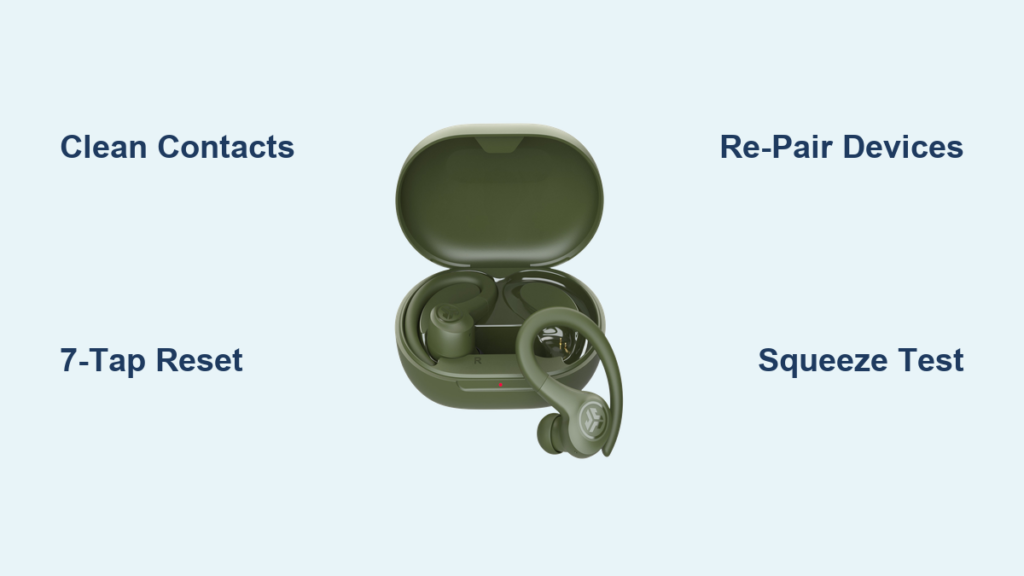
Few things are more frustrating than pulling out your JLab Sport earbuds for a workout, only to find silence in one ear. When your JLab Sport left earbud is not working, the right side keeps playing normally while the left goes dark, cuts out, or refuses to connect. This is one of the most reported issues across the Go Air Sport, Air Sport, and JBuds Air Sport lines.
The good news is that most cases can be fixed without buying replacements. Common culprits include dirty charging contacts, software sync errors, and internal wiring defects. In this guide, you will learn how to diagnose the exact cause, perform the correct factory reset for your model, and decide when to seek a warranty replacement. These step-by-step methods are proven to resolve the JLab Sport left earbud not working issue in the majority of cases.
Clean the Charging Contacts First

Before diving into resets, rule out the most common and easiest fix. A dead left earbud often simply is not charging because debris blocks the metal pins.
Check for Debris on Earbuds and Case
The left earbud may not be receiving power due to lint, earwax, or grime blocking the connection points. Without charge, no reset or pairing trick will bring it back to life.
- Inspect the stem of the left earbud for the small gold charging pad.
- Look inside the case at the spring-loaded pogo pins that touch the earbud.
- If you see dark smudges, fuzz, or buildup, cleaning is essential.
Use Dry Tools to Clean Safely
Never use liquids or metal objects on the pins. Instead, follow this safe protocol:
- Take a dry cotton swab or microfiber cloth.
- Gently wipe the earbud charging point.
- Clean each pin in the case by rotating the swab lightly.
Pro Tip: Use a toothpick with a blunt end to dislodge stubborn lint. Work carefully to avoid bending the pins.
After cleaning, place both earbuds in the case. Confirm charging by checking the LED behavior:
- A red light means charging is active.
- A white light means the battery is full.
- No light on the left means it is not receiving power. Clean again or test the fit in the case.
Run the 7-Tap Factory Reset
If the earbud charges but still does not work, a factory reset clears corrupted pairing data. The 7-tap method is the primary reset for most JLab Sport models.
Reset the Left Earbud
- Open the charging case lid.
- Place both earbuds inside. Do not remove them yet.
- Turn off Bluetooth on your phone.
- Forget the “JLab Go Air Sport” device in your Bluetooth settings.
- Tap the left earbud touch surface (logo area) seven times quickly.
- Look for four blue flashes. This confirms reset initiation.
Reset the Right Earbud
Immediately repeat the sequence on the right earbud. Tap the touch surface seven times quickly and watch for the same four blue blinks.
This sequence resets both units to factory defaults and forces them to re-synchronize with each other.
Confirm the Re-Sync Lights
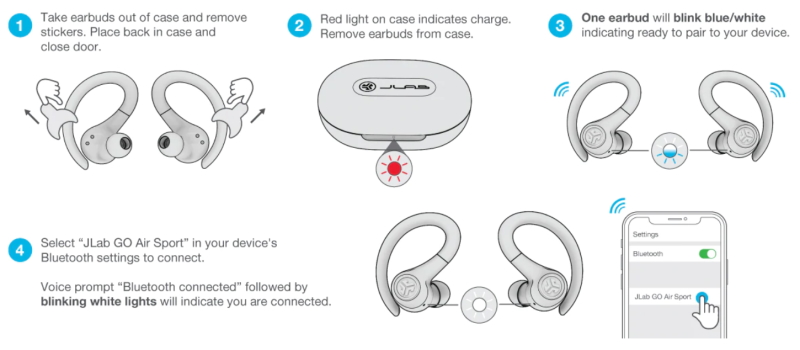
Leave the earbuds in the open case for 10 to 15 seconds. Watch the LED indicators closely:
- The right earbud should blink blue and white, indicating primary mode.
- The left earbud should show a solid white light, confirming it is synced to the right.
If both lights match this pattern, you are ready to pair with your phone.
Re-Pair Your JLab Sport Earbuds
Once the reset is complete, connect your earbuds to your device like new.
Enable Bluetooth and Connect
- Turn Bluetooth on your phone.
- Wait for “JLab Go Air Sport” or a similar model name to appear.
- Tap to pair.
Success signs to look for:
- A voice prompt saying “Bluetooth connected.”
- Audio playing in both ears.
- No manual connection to the left earbud is needed. It links automatically through the right.
What If Only One Earbud Plays Sound?
If only the right plays sound after pairing, the left earbud likely did not sync properly. Repeat the 7-tap reset process and ensure both earbuds are fully charged before retrying.
If neither earbud works, perform a manual power cycle:
- Hold both touch sensors for 3 seconds to turn off.
- Wait 10 seconds.
- Hold both touch sensors for 3 seconds to turn back on.
- Try the reset again.
Try Alternative Reset Methods
If the 7-tap method does not work, your model may require a different sequence. Firmware variations across production batches can change the reset protocol.
The 4-Tap Reset
Some firmware versions respond to a shorter tap count:
- With earbuds in the open case, tap the left earbud four times.
- Tap the right earbud four times.
- Remove both and place them on a flat surface within 2 inches of each other.
- Check for the right blinking blue and white, and the left showing solid white.
- Pair via Bluetooth.
This method works on select batches of Air Sport and JBuds Air Sport units.
The Hold-and-Beep Reset
For older units like the JBuds Air Icon, try this legacy method:
- Remove earbuds from the case.
- Press and hold the left earbud until you hear four to five beeps.
- Repeat on the right earbud.
- Place both back in the charging case.
- Press and hold both touch sensors simultaneously for 5 seconds while inside the case.
- Wait for rapid blinking, then stable lights.
Critical: This method only works inside the case. Skipping this step is the most common reason for failure.
Diagnose Hardware Failure
If resets and cleaning do not help, test for physical damage. Software fixes cannot repair broken internal wiring.
The Squeeze Test
- Put both earbuds in your ears.
- Play audio continuously.
- Gently squeeze the left earbud stem or body.
If sound returns only when pressed:
- You have an internal wiring break.
- This is a hardware defect, not a software issue.
- No amount of resetting will fix it permanently.
The flexible cable inside the earbud can disconnect at the hinge or driver connection due to repeated stress or poor manufacturing quality.
Tap to Temporarily Restore Connection
Some users report that tapping the bottom of the earbud with a pen or screwdriver handle briefly restores function. This may reseat a loose contact, but it is only a temporary workaround, not a real fix.
Decode the LED Light Signals

Understanding the lights removes guesswork from diagnosis. Here is a quick reference table:
| Status | Right Earbud | Left Earbud | What It Means |
|---|---|---|---|
| Ready to Pair | Blinks Blue and White | Solid White | Successfully synced |
| Reset Confirmed | 4 Blue Flashes | 4 Blue Flashes | Factory reset done |
| Charging | Red then White | Red then White | Power level indicator |
| Low Battery | Blinks Red | Blinks Red | Needs charging |
| Not Synced | Blinks Blue and White | Blinks Blue and White | Both still searching |
Key Insight: The right earbud is the master unit. It receives the Bluetooth signal from your phone and sends audio to the left. If the right is not synced or charged, the left cannot work, even if it is fully functional.
Optimize Placement and Avoid Interference
Even a properly synced earbud can drop connection due to signal issues. Environmental factors play a bigger role than most users realize.
Keep Your Phone on the Right Side
Since the right earbud is the primary receiver, carrying your phone in your left pocket or bag can block the signal. This causes intermittent audio, left earbud cutouts, and delayed playback.
Fix: Keep your phone on the right side of your body during use.
Avoid Bluetooth Congestion
Other wireless devices like Wi-Fi routers, speakers, and laptops can interfere with the signal. To improve stability:
- Turn off unused Bluetooth devices nearby.
- Stay within 3 feet of your phone during critical use.
- Avoid metal-heavy environments such as elevators or gym equipment.
Seek Warranty or Replacement
If all troubleshooting fails, it is time to escalate. You have two main resolution paths.
Contact JLab Support
JLab offers warranty coverage for manufacturing defects. Visit the JLab support site and provide your model, serial number (found on the case or receipt), and a clear issue description. They may send replacement earbuds or a full new set.
Warranty Tip: Even without proof of purchase, JLab often honors claims if the product is within one year and shows clear defect signs, such as a positive squeeze test.
Return to Retailer Immediately
If you purchased within the last 14 to 30 days, return to Best Buy, Amazon, or the original retailer. State clearly: “Left earbud does not work, defective out of the box.” Most stores offer instant exchanges.
Avoid delays: The longer you wait, the harder returns become.
Prevent Future Failures
Extend the life of your earbuds with simple daily habits. Prevention is far easier than repair.
Clean Weekly
- Wipe charging pins with a dry cloth every seven days.
- Remove ear tips and clean wax buildup regularly.
Store Properly
- Always place earbuds in the case when not in use.
- Ensure they click into place. Misalignment prevents charging.
Avoid Physical Stress
- Do not yank earbuds out by the stem.
- Do not squeeze or twist the handles aggressively.
- Use the ear hooks for stability instead of gripping the bud body.
Frequently Asked Questions About JLab Sport Left Earbud Not Working
Why is only the left JLab Sport earbud not working while the right works fine?
This is typically caused by a sync failure between the two earbuds or a dirty charging contact on the left unit. The right earbud acts as the master and transmits audio to the left. If the left loses its connection to the right, it goes silent even when fully charged. Start with cleaning and the 7-tap reset.
How do I reset my JLab Sport left earbud?
Place both earbuds in the open charging case with Bluetooth turned off on your phone. Tap the left earbud touch sensor seven times quickly, then immediately tap the right earbud seven times. Look for four blue flashes on each, then wait for the right to blink blue and white while the left shows solid white.
Will the 7-tap reset delete my phone’s Bluetooth pairing?
Yes. The factory reset clears the internal pairing memory on the earbuds themselves. You will also need to “Forget” the device in your phone’s Bluetooth settings before re-pairing to ensure a clean connection.
What does it mean if squeezing my JLab left earbud makes sound come back?
This indicates an internal wiring break, most often at the hinge or driver connection. It is a hardware defect that cannot be fixed with software resets. Contact JLab support for a warranty replacement or return the unit to your retailer.
How long is the JLab Sport warranty?
JLab typically covers manufacturing defects for one year from the purchase date. Warranty claims are often honored even without a receipt if the serial number is valid and the defect is clearly a manufacturing issue, such as the squeeze test failure.
Can I fix a JLab left earbud with no sound at home permanently?
Only if the cause is software-related or due to dirty contacts. If the squeeze test restores sound, the damage is internal and not user-repairable. In that case, warranty replacement is the only permanent solution.
Key Takeaways for Fixing Your JLab Sport Left Earbud
Start with the simplest fix: clean the charging contacts on both the earbud and the case. If the left earbud still does not work, perform the 7-tap factory reset with Bluetooth off and the device forgotten in your phone settings. This single step resolves the majority of JLab Sport left earbud not working cases caused by sync errors.
If resets fail, perform the squeeze test. Sound returning under pressure confirms a hardware defect that requires a warranty claim or retailer return. Do not waste time on repeated resets once a wiring break is identified.
Your next step: clean the contacts now, then run the 7-tap reset. If audio returns in both ears, you are done. If not, contact JLab support with your serial number ready, or head to your retailer for an exchange while the return window is still open.