Is your Olevs watch strap too loose? You’re not alone. Many new Olevs owners need to resize their stainless steel bands for a snug, comfortable fit. The good news: you can easily remove links at home with the right tools and technique—no trip to the jeweler required. This guide shows you exactly how to remove links from an Olevs watch strap safely and correctly, step by step.
Whether you’re adjusting it for the first time or fine-tuning the fit, you’ll learn how to identify pin types, use the proper tools, and reassemble the band securely without damaging your watch.
Identify Your Link Type First
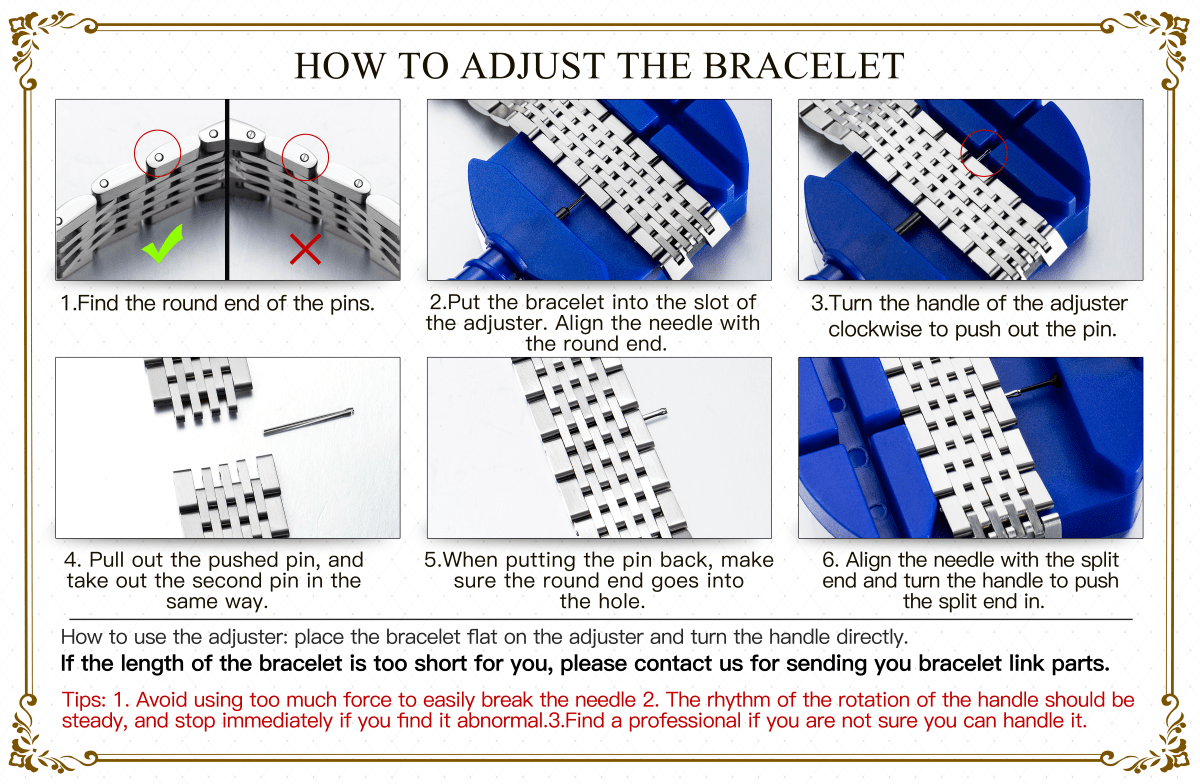
Before touching any tools, inspect the side of your Olevs watch band to determine how the links are secured. Getting this wrong can damage the band.
Pin-Type vs. Screw-Type Links
Most Olevs straps use pin-type links. These are small metal pins visible on one side of the link with a round end on one side and a split (grooved) end on the opposite. These pins snap into place and hold the links together.
Some models, especially premium versions, use screw-type links. These have tiny screws instead of pins. If you see a slot or crosshead on the edge of the link, you’ll need a precision screwdriver, not a pin pusher.
Quick Tip: If no screws are visible and you see small metal rods ending in a round tip, you’re dealing with pin-type links. Proceed with pin removal.
Gather the Right Tools

Using improper tools can scratch your band or break the pins. Here’s what you actually need.
• Dual-purpose watch link tool (recommended): Holds the band securely and has a threaded plunger to push pins smoothly.
• Small watch repair kit: Includes push pins, a screwdriver, and a soft-jawed holder.
• Fine-tipped tweezers: For safely removing loose pins and small parts.
• Precision screwdriver: Required if your model uses screws.
• Soft cloth or mat: Prevents scratches during work.
Avoid using nails, paperclips, or knives. They can slip and damage the band or injure you.
Prepare the Watch Band
Remove Watch from Wrist
Take the watch off and place it on a clean, flat surface. Work in a well-lit area with minimal clutter.
Mark Removal Links
Decide how many links to remove. Most Olevs bands allow symmetrical removal. Take the same number from each side of the clasp for balanced appearance and function.
Time Estimate: Planning takes 2 to 3 minutes. Removing one link takes 5 to 8 minutes.
Locate the Pin Ends Correctly
This is the most critical step. Pushing from the wrong side can jam or break the pin.
Find the Round and Split Ends
The round end of the pin is smooth and solid. This is the side you push from.
The split (grooved) end has a small cut or indentation. This side receives the pin and compresses during insertion.
Visual Cue: Look closely at the link edge. The round end is slightly wider and flush, while the split end may look segmented.
Eject the Pin Safely
Use the Dual-Purpose Tool
- Place the band into the tool’s slotted base.
- Align the needle with the round end of the pin.
- Turn the handle clockwise slowly and steadily.
- Push until the pin protrudes 2 to 3 mm from the split end.
Warning: Do not force it. If resistance increases suddenly, stop and check alignment.
Remove the Pin Completely
Once the pin is partially out, use tweezers or your fingers to pull it the rest of the way. Set it aside with the removed link.
Pro Tip: Place pins and links in a small container. Label it “Olevs spare parts” in case you need to re-expand the band later.
Remove the Link
Separate the Links
After removing both pins securing the target link, gently pull the links apart. They should separate smoothly.
Keep Extra Links
Olevs does not always sell individual replacement links. If you ever need to lengthen the band, having spares is essential.
Storage Tip: Use a ziplock bag or magnetic tray to avoid losing small parts.
Repeat for Additional Links
Work on one link at a time. Always confirm pin direction, push from the round end to split end, and store pins and links safely.
Symmetry Rule: Remove the same number of links from both sides unless your model allows asymmetrical adjustment.
Reinsert Pins After Resizing
Once links are removed, you may need to reattach the clasp or finalize the band length.
Align the Holes Perfectly
Misaligned holes make reinsertion difficult. Hold the links steady and ensure the pin holes line up straight.
Insert the Split End First
- Place the split end of the pin into the hole. It’s slightly tapered to compress.
- Position the band back in the tool or on a soft surface with a dimple (like a pin vise).
- Align the needle with the round end.
- Turn the handle clockwise to drive the pin in.
Success Signal: The pin clicks into place when the split end expands inside the final hole.
Verify a Secure Fit
Check Flush Alignment
Both ends of the pin should be flush with the link. If one end sticks out, gently push it in further.
Test the Connection
Gently tug the links apart. There should be no movement or looseness.
If the pin feels loose or wobbly, it may not be fully seated. Reinsert carefully.
Common Mistakes to Avoid
Even experienced DIYers make these errors. Do not let them ruin your Olevs band.
• Pushing from the wrong side: Never push from the split end. It’s designed to compress inward, not be driven outward. Doing so can deform or break the pin.
• Using excessive force: The tool’s needle is thin and can bend. Apply steady, gradual pressure. Let the tool do the work.
• Losing pins: Pins are tiny and easy to lose. Work over a tray or cloth to catch falling parts.
• Forcing misaligned links: If the pin won’t go in, do not hammer it. Check hole alignment and pin orientation first.
When to Seek Professional Help
Too Many Links Removed?
If your band is now too tight and you don’t have spare links, contact Olevs customer support. They may provide additional links upon request.
Unsure About the Process?
If you’re uncomfortable working with small parts or your model has an unusual design, visit a local jeweler or watchmaker. Most charge $10 to $20 for link removal. It’s worth it to avoid damage.
Expert Note: Some Olevs models have directional links or non-standard pin sizes. When in doubt, professional adjustment is safest.
Maintenance Tips for Longevity
A well-maintained Olevs strap lasts years. Follow these habits.
Clean the Band Regularly
Wipe with a soft, dry cloth after wear. For deeper cleaning, use mild soapy water and a soft brush. Dry thoroughly.
Inspect Pins Periodically
Check for looseness, especially after resizing. A wobbly pin can lead to link failure.
Avoid Harsh Conditions
Do not wear the steel band in saltwater, chlorinated pools, or while using chemicals. Moisture and corrosion weaken pins over time.
Final Fit Check
Wear the Watch
Put it on and move your wrist. The band should fit snugly without pinching, allow one finger to slide underneath comfortably, and stay in place during movement.
Make Micro-Adjustments
If it’s still too loose or tight, remove or reinsert one more link as needed.
Goal: A secure, comfortable fit that looks polished and professional.
Summary: Key Steps to Remove Links
- Inspect band for pin or screw type.
- Use correct tools. Never improvise.
- Push pins from round to split end.
- Remove links symmetrically when possible.
- Save all removed parts.
- Reinsert pins carefully. Split end first.
- Test fit and secure connection.
- Seek help if unsure.
Frequently Asked Questions About Removing Olevs Watch Strap Links
What tools do I need to remove links from my Olevs watch?
You need a dual-purpose watch link tool (recommended), a small watch repair kit with push pins, fine-tipped tweezers, a precision screwdriver (if screws are used instead of pins), and a soft cloth or mat to prevent scratches.
How do I know if my Olevs watch uses pins or screws?
Examine the side of the link closely. If you see small metal pins with a round end on one side and a split (grooved) end on the other, you have pin-type links. If you see visible screws with a slot or crosshead, you have screw-type links and need a precision screwdriver.
Which direction should I push the pins when removing links?
Always push from the round end toward the split end. The round end is the driver side, while the split end is designed to compress inward. Pushing from the wrong direction can damage or break the pin.
Can I remove links from only one side of my Olevs watch band?
For the best appearance and function, remove the same number of links from both sides of the clasp. This maintains symmetry. However, some models may allow asymmetrical adjustment if needed for a specific fit.
What should I do if my Olevs watch band is now too tight?
If you’ve removed too many links and the band is now too tight, contact Olevs customer support. They may provide additional link parts upon request. Alternatively, visit a professional watchmaker who may have compatible spare links available.
Final Thoughts on Removing Olevs Watch Strap Links
Resizing your Olevs watch strap is a simple, satisfying DIY task when done right. With this guide, you now know exactly how to remove links from an Olevs watch strap safely and effectively. The key steps are identifying your link type, using proper tools, pushing pins from round to split end, and storing all removed parts for future use.
Remember to work slowly and deliberately over a protected surface. Check your fit after adjustment and make micro-adjustments as needed. If you’re ever unsure about the process or risk damaging your watch, a professional watchmaker can handle the job for a modest fee.
Keep your tools handy, work patiently, and enjoy a perfect fit straight from your wrist.