When your Bose Sport Earbuds refuse to charge, blink red and white, or die mid workout, frustration sets in fast. These true wireless earbuds pack impressive audio into a sealed, sweat resistant design, but that same sealed build makes long term ownership difficult. Battery degradation, charging failures, and water resistance loss are common complaints from active users.
This guide covers every viable Bose Sport Earbuds repair path available today. You will learn how to qualify for a free official refurbishment, replace the internal 3.7V Varta CP1254 A3 battery at home, and choose a trustworthy third party service when DIY feels too risky. We will also break down costs, turnaround times, and waterproofing concerns so you can make the smartest decision for your gear.
Diagnose the Red and White Blink Defect
Identify the Known Hardware Issue
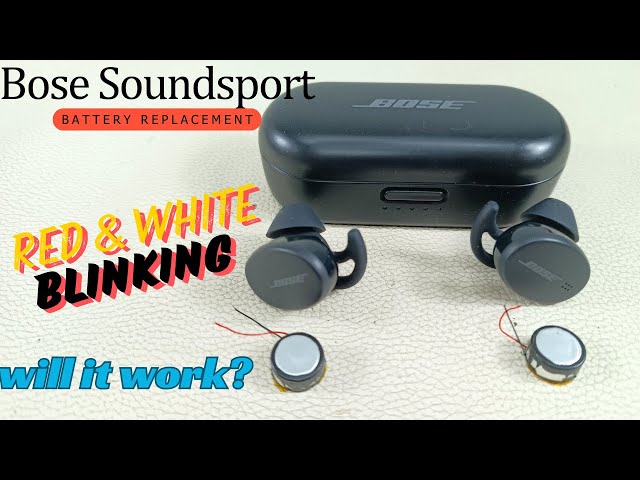
If your Bose Sport Earbuds flash red and white lights the moment they touch the charging case, you may be looking at a documented factory defect. Bose has acknowledged this specific failure pattern and offers a targeted service program for affected Model 247929 units. The defect typically appears as continuous red and white blinking with zero charging response.
This is not a battery age issue. It is a hardware fault that Bose has committed to fixing at no cost to qualifying owners, even those outside the standard warranty window.
Confirm Your Repair Eligibility
Before paying anyone for repairs, run through this quick eligibility checklist:
- Earbuds blink red and white when placed in the case
- No charging response after troubleshooting
- You own Model 247929 (true wireless Sport Earbuds)
- No visible physical damage from misuse or submersion
If all four points match, skip third party quotes and head straight to official Bose service.
Run Mandatory Troubleshooting Steps
Complete the Four Required Steps
Bose will not approve a service request until you complete these verified troubleshooting actions. Skipping any step results in automatic rejection.
- Clean the charging contacts on both earbuds and the case using a dry microfiber cloth
- Place both earbuds in the case, close the lid, and hold the case button for 10 seconds to reset
- Open the Bose Music app, confirm both earbuds connect, and install any pending firmware updates
- Swap to a different USB-C cable and wall adapter, or test charging via a laptop
If the red and white blink persists after all four steps, your unit qualifies for official service.
Submit Your Official Bose Service Request
Locate Your Serial Number
Each earbud carries a unique four digit serial number printed beneath the rubber ear tip. Gently remove the tip and look for the number alongside a small QR code. Write down both serials before submitting your request.
Complete the Online Submission
Follow this exact workflow on the Bose Support website:
- Search for “Bose Sport Earbuds not charging”
- Complete every on-screen troubleshooting prompt
- Scroll to the bottom and click “Click here to start service”
- Type the four digit serial number manually (do not scan the QR code)
- Submit the form and wait for confirmation
Pro tip: If one serial gets rejected, try submitting with the other earbud’s number. Several users have reported success this way when the system flags one unit.
Know What to Expect from Official Service
- Cost: Free for confirmed defects
- Turnaround: 1 to 1.5 weeks after Bose receives your unit
- Replacement type: Refurbished units, not brand new
- Shipping: Paid by Bose after original unit verification
Replace the Battery Yourself at Home
Gather the Right Tools and Parts
DIY Bose Sport Earbuds repair is possible, but only with precision tools and correct materials. Standard glue or soldering will destroy both waterproofing and functionality.
Required items:
- Heat gun set to 170°C with 70% airflow
- Thin metal pry tool
- Nylon spudger (non-scratching)
- Fine tip flathead screwdriver
- Isopropyl rubbing alcohol
- Cold press adhesive in a syringe applicator
- Replacement Varta CP1254 A3 3.7V battery (OEM recommended)
- Small clamps or rubber bands
- Lint free cloths
Warning: Never substitute superglue or epoxy. These fail under sweat and heat and can crack the plastic housing.
Open the Earbud Housing Safely
- Apply even heat around the housing seam for 30 to 60 seconds, rotating the heat gun slowly
- Insert the metal pry tool gently into the seam to create a small gap
- Switch to the nylon spudger and work around the perimeter to separate the halves
- Locate the ribbon cable connecting the outer shell to the internal PCB once open
Remove the Old Battery
The battery connects via adhesive and a single metal contact leg. The back of the cell acts as the second electrical contact, so handle it carefully.
- Apply brief heat to the battery area to soften the adhesive
- Use the nylon spudger to gently lift the metal contact leg
- Dab the spudger tip in isopropyl alcohol to dissolve sticky residue
- Peel the battery away slowly once the contact is free
- Disconnect the ribbon cable if you need full access to the PCB
Critical: Pull slowly. Yanking risks tearing the PCB pad and creating a permanent fault.
Clean and Prepare the Housing
Any leftover adhesive ruins the new seal. Take your time here.
- Use heat and the flathead tool to scrape all old adhesive from the battery compartment, inner housing edge, and frame surface
- Wipe every surface with a lint free cloth and isopropyl alcohol
- Allow everything to dry completely before proceeding
Install the New Battery and Reseal
- Apply cold press adhesive in a continuous, unbroken line around the housing edge using the syringe
- Seat the new Varta CP1254 A3 battery, ensuring the contact leg aligns perfectly and the back sits flush
- Reconnect the ribbon cable to the outer shell
- Press both housing halves together firmly
Cure the Adhesive Properly
- Clamp the earbud with rubber bands or small clamps to maintain steady pressure
- Let it cure for 24 hours in a dry, room temperature space
- Do not charge or wear the earbuds during the cure window
After curing, test the charging function and confirm IPX4 sweat resistance is restored.
Use a Certified Third-Party Repair Service
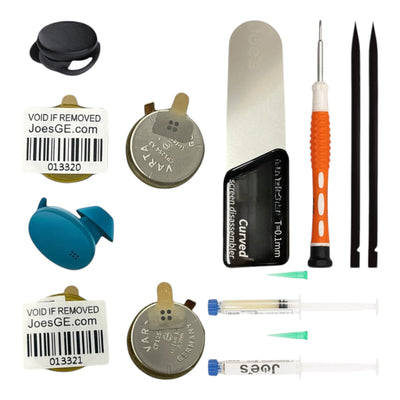
Joe’s GE: Specialized Audio Repair in the USA
Joe’s GE offers a mail-in Bose Sport Earbuds repair service with strong credentials for audio electronics.
- Turnaround: 2 to 5 days for repair plus 1 to 2 weeks total shipping
- Warranty: 100 day limited coverage on all repairs
- Cost: Quote based with no upfront fee
- Shipping: Free pre-paid label provided
- Parts: OEM or high quality equivalents
- Data policy: Technicians do not access data, though pairing keys may reset
Fees if no repair occurs:
- $40 if you decline the repair quote
- $25 if the item is not on their service list or is counterfeit
Supported repairs include battery replacement, charging port fixes, and board level issues. Contact support first to confirm your specific Bose Sport Earbuds repair needs are covered.
Find a Qualified Local Repair Shop
Not every local shop can handle Bose Sport Earbuds. Confirm experience before sending your device.
| Shop | Specialty | Cost Estimate | Notes |
|---|---|---|---|
| Audio Repair Center (17th St) | Earbuds and wiring | Around $40 | Confirmed Bose repair history |
| TechFix Solutions | General audio | Call ahead | May lack Bose specific parts |
| HB Electronics Repair (Brookhurst) | Small devices | Around $35 | Known for honest service |
Rule of thumb: If the shop has never fixed Bose Sport Earbuds before, move on. Precision and proper adhesive matter too much to gamble on inexperience.
Troubleshoot Common Bose Sport Earbuds Failures
Fix Charging Problems With No Lights
If your earbuds show no LED response at all:
- Clean the contacts with a dry cloth
- Try a different USB-C cable and power source
- Reset the case by holding the button for 10 seconds
- Update firmware through the Bose Music app
Still dead after all four steps? You are likely looking at battery failure or a charging circuit fault.
Resolve Bluetooth Pairing Failures
When earbuds refuse to connect to your phone:
- Reset by holding both earbuds for 15 seconds until the LED flashes
- Forget the device in your phone’s Bluetooth settings
- Re-pair through the Bose Music app
- Contact Bose Support if the issue persists, as a hardware fault may qualify for replacement
Pro tip: The Bose app can run remote diagnostics and may trigger a free replacement if it detects a confirmed defect.
Repair Wired SoundSport Models
For older Bose SoundSport Wireless units (Model 761529-0010), different issues apply.
Power button not responding:
- Clean with a soft brush or compressed air
- Avoid liquids that can corrode internals
- Persistent failure requires disassembly and soldering
- Professional repair costs around $35 to $40
One earbud silent:
- Classic sign of internal wire break from bending or pulling
- Requires opening the housing and re-soldering the broken segment
- Feasible at specialty shops like Audio Repair Center
Reality check: Wired model repairs often cost more than replacement, unless the unit carries sentimental value.
Maintain Waterproofing and Battery Health After Repair
Reapply Adhesive Correctly Every Time
The cold press adhesive is not optional. It is the only thing keeping sweat and moisture out of the internal electronics. After any disassembly:
- Use only water resistant sealant designed for electronics
- Apply a continuous bead with no gaps
- Cure for 24 hours under steady pressure
Any gap in the seal leads to moisture ingress, corrosion, and permanent failure.
Protect Long Term Battery Health
Lithium-ion cells degrade faster when exposed to heat and deep discharge cycles.
Best practices:
- Avoid leaving earbuds in hot cars or direct sunlight
- Do not charge in extreme cold
- Store at roughly 50% charge if unused for several weeks
- Use certified USB-C cables only
Repair vs Replace: Make the Right Call

| Option | Cost | Turnaround | Waterproofing | Best For |
|---|---|---|---|---|
| Official Bose Service | Free if eligible | 1 to 1.5 weeks | Fully restored | Red and white blink defect |
| Joe’s GE Repair | Quote based | 1 to 2 weeks | Likely restored | Out of warranty, no blinking |
| Local Shop | Around $35 to $40 | 1 to 3 days | Risk of failure | Wired model fixes |
| DIY Repair | $15 to $20 parts | Immediate | High risk by skill | Tech savvy tinkerers |
When to DIY: Only if you have micro-repair experience and proper tools.
When to use official service: Red and white blinking means a free fix. Never pay out of pocket first.
When to use third party: Out of warranty, no blinking pattern, but the battery is clearly dead.
Frequently Asked Questions About Bose Sport Earbuds Repair
Why Are My Bose Sport Earbuds Blinking Red and White?
This blink pattern signals a known hardware defect in Model 247929 units. Bose runs a free refurbishment program for affected earbuds. Complete the four mandatory troubleshooting steps first, then submit a service request with your four digit serial number.
Can I Replace the Bose Sport Earbuds Battery Myself?
Yes, the internal Varta CP1254 A3 3.7V battery is replaceable with the right tools. You need a heat gun, nylon spudger, cold press adhesive, and steady hands. Expect a 24 hour adhesive cure time before testing.
How Much Does Third-Party Bose Sport Earbuds Repair Cost?
Mail-in services like Joe’s GE offer free quotes with no upfront fee. Local shops typically charge between $35 and $40 for common fixes. DIY parts run around $15 to $20 if you already own the tools.
Will Repairing My Earbuds Restore Water Resistance?
Only if you use cold press adhesive applied in a continuous bead and allow a full 24 hour cure under pressure. Standard glues fail under sweat and heat, leaving the internals exposed to moisture damage.
How Long Does Official Bose Service Take?
Expect 1 to 1.5 weeks from the time Bose receives your original unit. Refurbished replacements ship out once verification is complete. The service is free for confirmed red and white blink defects.
Is It Worth Repairing Older Bose SoundSport Wireless Earbuds?
Usually not. Repair costs of $35 to $40 often match or exceed the price of a new entry-level wireless set. Repair only if the unit has sentimental value or specific features you cannot replace elsewhere.
Final Takeaways for Your Bose Sport Earbuds Repair
Start every repair journey by checking for the red and white blink defect. If your unit qualifies, official Bose service delivers a free refurbished replacement with full waterproofing restored. If the battery is simply dead without the blink pattern, a certified third party like Joe’s GE offers solid warranty coverage and professional results. DIY repair works for skilled tinkerers willing to invest in proper tools and accept the waterproofing risk.
Before sending any earbuds out for service, forget the device in your phone’s Bluetooth settings to clear pairing data. After any repair, give the adhesive a full 24 hour cure and avoid moisture until the seal is confirmed solid. With the right approach, your Bose Sport Earbuds repair can extend their life well beyond the standard battery cycle.